Menu

Showing posts with label Tutorial. Show all posts

How to create pagination in oracle 11g

We can create pagination in oracle itself, while querying for data. Pagination helps us to get the specific result instead of returning all the result from database.
Lets understand this using an example:
Suppose we have a table client_table which have thousands of client information, and when we query on the table it return thousands of records or all the records which match the query. By executing the below database query, you will get all the records from database table.
e.g. SELECT * FROM client_table
But here we don't want all the record at a time, we want the records in chunk, so we can easily investigate and understand the record and make it more readable and easier to analyse. To do so, we will optimize the same query and add the pagination into it, in pagination we will specify begin and end of row, which is actually from row number to to row number which we want to fetch.  
Here is a simple example of pagination, where we are querying database to provide the range of data.

SELECT * FROM(
SELECT CT.*, rownum FROM client_table CT) rowss
WHERE rowss."ROWNUM" BETWEEN 12 and 17;
Above query will fetch the record from row number 12 to 17 and return only 6 record to you.

References:

https://docs.oracle.com/cd/B14117_01/server.101/b10759/pseudocolumns008.htm
https://stackoverflow.com/questions/4552769/sql-rownum-how-to-return-rows-between-a-specific-range
https://oracle-base.com/articles/12c/row-limiting-clause-for-top-n-queries-12cr1
https://renenyffenegger.ch/notes/development/databases/Oracle/SQL/select/first-n-rows/index 
How to swap two variable without using temporary variable in java?

Swap two integer variable a and b without using any temporary variable.
Set the initial value for two variable and then swap the value from a to b and b to a. Below is the code snippet written in Java programming to swap two variable without using third variable.

 1
 2
 3
 4
 5
 6
 7
 8
 9
10
11
12
13
package jorvee;

public class SwapTwoIntegerVariableWithoutUsingTheThirdVariable {

 public static void main(String[] args) {
  int a=5, b=3;
  System.out.println("Before swap value of a: "+a +" and value of b: "+b);
  a = a*b;
  b = a/b;
  a = a/b;
  System.out.println("After swap value of a: "+a +" and value of b: "+b);
 }
}

Output:

Before swap value of a: 5 and value of b: 3
After swap value of a: 3 and value of b: 5

Another approach to do the same. Swap two variable without using third variable

How to swap two Integer variables without using the third variable?

Swap two integer variable a and b without using any temporary variable.
Set the initial value for two variable and then swap the value from a to b and b to a. Below is the code snippet written in Java programming to swap two variable without using third variable.

 1
 2
 3
 4
 5
 6
 7
 8
 9
10
11
12
13
package jorvee;

public class SwapTwoIntegerVariableWithoutUsingTheThirdVariable {

 public static void main(String[] args) {
  int a=5, b=3;
  System.out.println("Before swap value of a: "+a +" and value of b: "+b);
  a = a+b;
  b = a-b;
  a = a-b;
  System.out.println("After swap value of a: "+a +" and value of b: "+b);
 }
}

Output:

Before swap value of a: 5 and value of b: 3
After swap value of a: 3 and value of b: 5

Another approach to do the same. Swap two variable without using third variable 

How to uninstall an application from Microsoft store in Windows 10

This tutorial is for those users who are using Microsoft store and directly installing application from store in their Windows machine.
When you open the installed section of Microsoft store, where you could find all the installed applications and software in your Microsoft store. But here you will not find the option to uninstall an application.

Now you have an app installed, which you are not using from long back or no more beneficial for you, hence decided to uninstall from your machine. Then from where you will uninstall that application, so it may free your system memory and clean your Microsoft store? 

In this article we will let you know how to remove or uninstall an application from windows 10. Below are steps which you need to follow to uninstall an application from Microsoft store in windows 10.

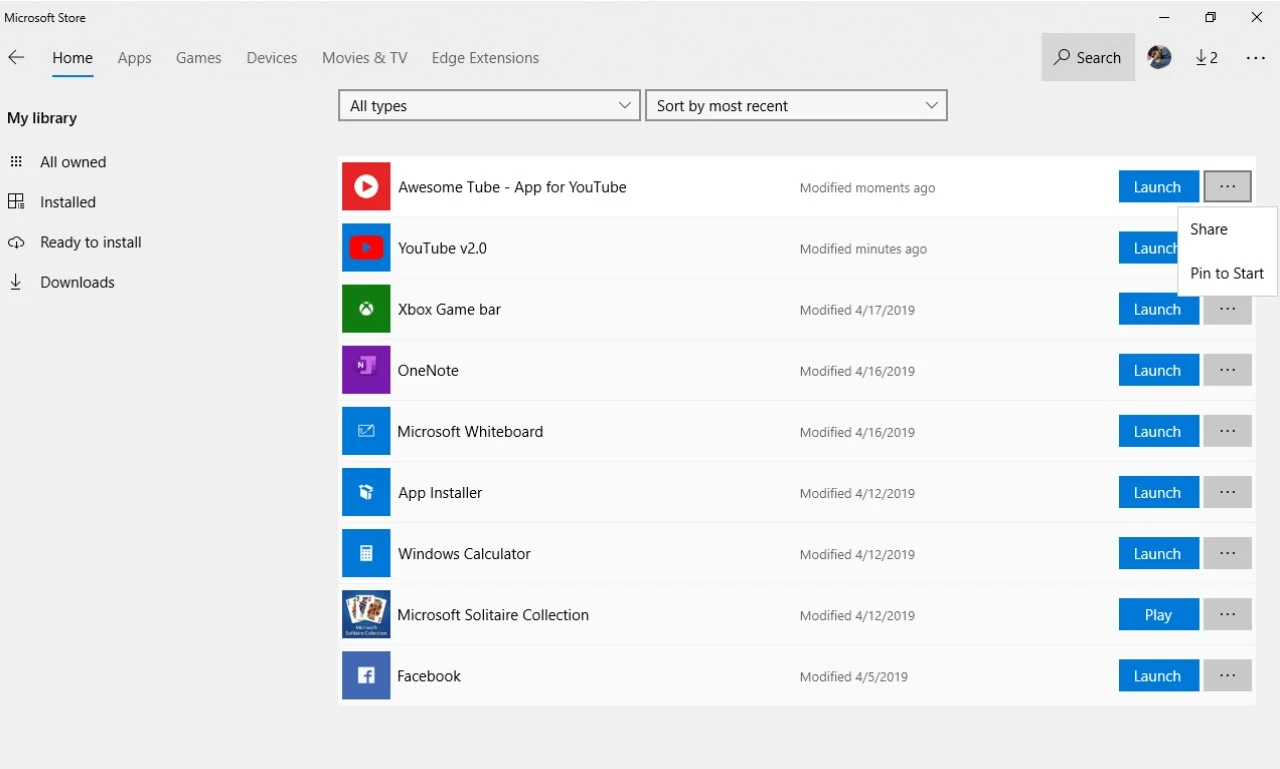
Step 1: Open Microsoft store from your Windows machine and click on the installed tab to check what all applications are installed in your machine. below is the screenshot.

microsoft-store-installed
Microsoft store installed tab


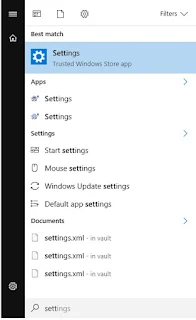
Step 2: Press start/window button and search for settings 


windows-settings
Search settings

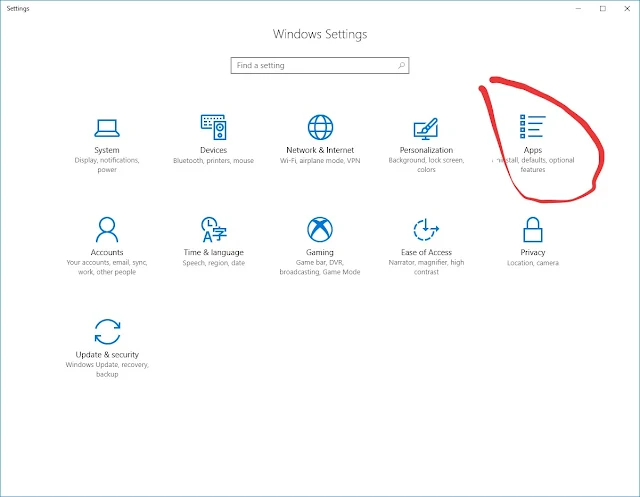
Step 3: Open settings, when you will click on the settings it will open a new window like below. From this setting dashboard click on the Apps as highlighted.

settings-dashboard
settings dashboard
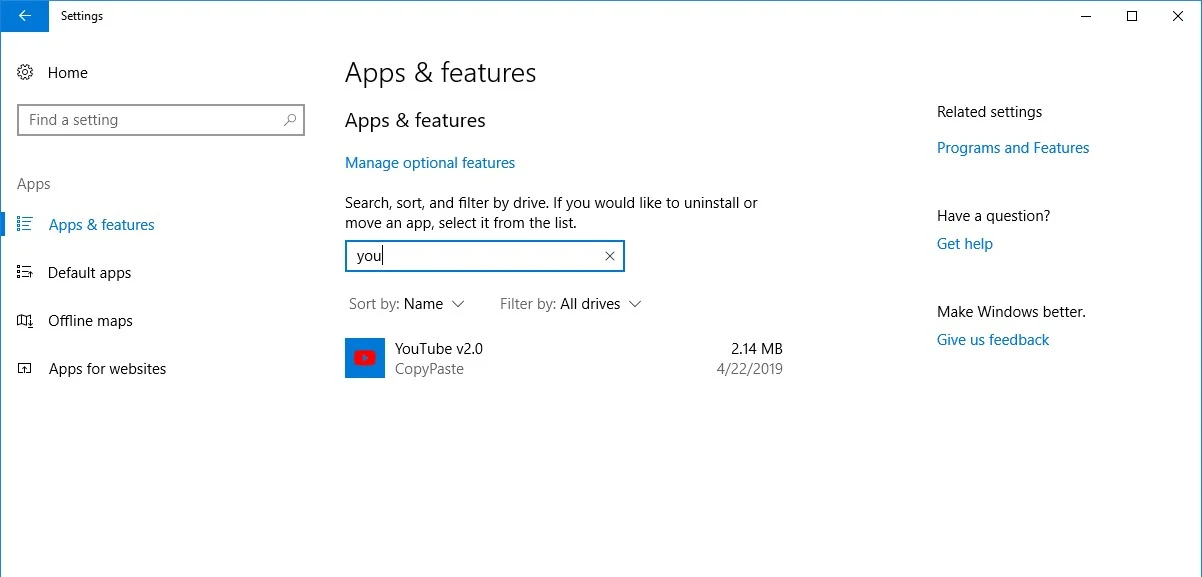
Step 4: This Apps will open a new screen to you. Below is the screenshot. On this screen, from search box search the application which you want to uninstall.

Apps-and-feature-uninstall-an-app
Apps and feature screen in windows 10
Step 5: When you find the application which you want to remove, then click on the application and click on the uninstall button.

uninstall-an-application-from-windows10
uninstall an application from windows 10

You have successfully uninstalled application from your machine.

How to find the PID using port number

What will you do if you don't know which program and service is registered and running on a port number?
Here we have a simple way to find that, which service and task is registered on a port number in just a few steps.
For example if you wants to check for the port number 4502, which service is running on this port, then first you have to find the PID(processing ID) associated with that port number. to do so follow the following steps:
  1. Open Command prompt(cmd) in your windows machine. Go to start and search for cmd. 
  2. Then copy the below command and paste in cmd window and hit enter.
  3. netstat -aon | findstr "<port number>"
  4. It will give you the result which have following:
    1. TCP: This contains the IP with port number.
    2. IP address: IP address which is serving and consuming this serving.
    3. Listening: Process ID(PID) associated with this port number.

Below is the screenshot:

How to find PID using port number in windows


Now follow my next blog to find the service or task using PID.

How to find which task is running on PID on Windows OS

If you know the PID, then you can easily track which service and task is active and running on that particular PID. If you don't know PID but you have port number then go through by my previous blog how to find the PID using port number.
To find the running service on PID do the following:


  1. Open Command prompt(cmd) in your windows machine. Go to start and search for cmd. 
  2. Then copy the below command and paste in cmd window and hit enter.
  3. tasklist /FI "PID eq <PID number>"
  4. It will give you the result which have following:
    1. Image Name: Name of the service and program which is executing on this PID.               
    2. PID : PID number
    3. Session Name: Where it is active, whether in the form of service or console.
    4. Session: How many session are active(number of active sessions) for this particular service or program.
    5. Mem Usage: How much memory this service and program is consuming in your machine.
Below is the screenshot:


how to find running service on a PID in windows

HTTP/2 features and upgrade

1. What is HTTP or HTTPS?

Hypertext Transfer Protocol (HTTP) is a protocol that is, the foundation of data communication for the World Wide Web.
HTTP is based on the Client and Server model. Where client send the request to server and then server send the response to the client based on the request. Here HTTP comes in picture and act as bridge between client and server to communicate with each other.

2. HTTP/2

In 2015 web world get an enhanced version of HTTP protocol HTTP/2. HTTP/2 provides us with many new mechanics that will mitigate HTTP/1.1 issues. HTTP/2 will make our applications faster, simpler, and more robust, which improve the performance of your website and that helps your organization to make more customer and more customers means more business. HTTP/2 transport the content in low-latency over World Wide Web.

3. Advantage of HTTP/2


3.1. Request and response multiplexing

HTTP/2 can send multiple requests and response for data in parallel over a single TCP connection. This is the most advanced feature of the HTTP/2 protocol because it allows you to download web files asynchronously from one server. HTTP/2 doesn’t make multiple TCP connections to transfer the content as HTTP/1.x does.

3.2. Binary protocol

The latest HTTP version has evolved significantly in terms of capabilities and attributes such as transforming from a text protocol to a binary protocol. HTTP1.x used to process text commands to complete request-response cycles. HTTP/2 will use binary commands (in 1s and 0s) to execute the same tasks.
Browsers using HTTP/2 implementation will convert the same text commands into binary before transmitting it over the network.

3.3. Header Compression

Each HTTP transfer carries a set of headers that describe the transferred resource and its properties. In HTTP/1.x, this metadata is always sent as plain text and adds anywhere from 500–800 bytes of overhead per transfer, and sometimes kilobytes more if HTTP cookies are being used.
To reduce this overhead and improve performance, HTTP/2 compresses request and response header metadata using the HPACK compression format that uses two simple but powerful techniques:

  1. It allows the transmitted header fields to be encoded via a static Huffman code, which reduces their individual transfer size.
  2. It requires that both the client and server maintain and update an indexed list of previously seen header fields (i.e., establishes a shared compression context), which is then used as a reference to efficiently encode previously transmitted values.

 3.4. Prioritization is resource/content

With HTTP/2 browsers prioritize requests based on type/context, and immediately dispatch the request as soon as the resource is discovered. The client can indicate the priority of the resource and communicated to the server (that’s get calculated by weights + dependencies of that resource), so server can fulfill those request before other requests.

4. How to enable SSL in AEM?

Please refer the Adobe document >> Enable SSL in AEM5

5. How to enable HTTP/2 on web server?

HTTP/2 is supported by all modern browsers, you have to just enable the HTTP/2 on your web server. To do so below are the steps and prerequisite.

5.1. Steps to enable HTTP/2 on Apache

To get HTTP/2 working on Apache you need to enable and load SSL and HTTP/2 modules6. To do so, you may run the following in your terminal:
sudo a2enmod ssl
then run this>>
sudo a2enmod http2
To activate the above modules you have to restart your server, to do so run the following:
sudo systemctl restart apache2
Now open your global Apache configuration or inside of a particular virtual host and apend the below line in your configuration.
Protocols h2 http/1.1

5.2. Prerequisites


  • Enable SSL or HTTPS on your server. Enable SSL in AEM5
  • TLS protocol version >= 1.2 with modern cipher suites is required.
  • Ensure that you are running Apache 2.4.17 or above. Because HTTP/2 doesn’t support in lower version of Apache.


6. References


What is experience fragment in AEM?


  • Experience fragment is a kind of page or content.
  • Experience fragment is reusable content, we could use same content in multiple pages.
  • Experience fragment is fully responsive, and support and fit in almost all the screen size.
  • Experience fragment have variations for omni-channel delivery.
  • Experience fragment is based on template design, we have to create a template of the content before creating a experience fragment. In template we specify the layout of our content.
  • We can use experience fragment as a page.
  • Using experience fragment we can create a post or page for social media and other channels(using template) and feed or publish your post or page directly on those channels from AEM (adobe experience manager).
  • Experience fragment is more innovative version of  content fragment in AEM.
  • Experience fragment feature comes in AEM 6.3.
  • Experience fragment can have content fragment into it.

See also:

What is content fragment in AEM?


  • Content fragment is only content without any styling, or you could say it is pure text without formatting.
  • Content fragment is simple, and have only structure of the content. This structure could be paragraph, input field; which separate the multiple copy of text and input parameters at one place.
  • Structure of the content fragment is define in the model.
  • Create a content fragment model to create a new structure of your content fragment.
  • Content fragment is just only a component.
  • Using content fragment you can design undecided content, and use later on according to your requirement.
  • Content fragment is stored as an asset in DAM (digital asset management).
  • Content fragment will be always implemented as an asset.
  • Content fragment can have variation, which means you can create different variation of the same content for different platform.
  • Content fragment summarize your content at one place, so you can access the complete content in just one go.

See also:

Create JS Object from JSON text

How to traverse on JSON (JavaScript object notation) object using JavaScript and how to traverse JSON array using JavaScript?

Below is the simple HTML and JavaScript based program, which have a JSON data object and further that json object have json array. Using JavaScript we will read that json data one by one and generate output for end user, and later that output we will show on html page.

 1
 2
 3
 4
 5
 6
 7
 8
 9
10
11
12
13
14
15
16
17
18
19
20
21
22
23
24
25
<html>
<body>
<h2>Create JS Object from JSON String</h2>
 <p id="output">
 </p>
<script>
var txt = '{"employees":[' +
'{"firstName":"Rashid","lastName":"Jorvee" },' +
'{"firstName":"Java","lastName":"Script" },' +
'{"firstName":"Node","lastName":"JS" }]}';


var jsonData = JSON.parse(txt);
var output="";
for (var i = 0; i < jsonData.employees.length; i++) {
    var counter = jsonData.employees[i];
    console.log(counter.firstName);
    output += "First name: " +  counter.firstName +  ", Last Name: " +counter.lastName +"<br />";
 document.getElementById("output").innerHTML = output;
   
}

</script>
</body>
</html>

Output:

Create JS Object from JSON String

First name: Rashid, Last Name: Jorvee
First name: Java, Last Name: Script
First name: Node, Last Name: JS

Output on browser console: 

console output on browser debugger console

How to create an OSGi fragment project?

Hello readers, today we are going to explain how to create an OSGi fragment project using Eclipse IDE.

The first step to create OSGi fragment is to understand the need of the OSGi fragment and select a host bundle using which this OSGi fragment is going to access and resolved within your application. To understand the OSGi fragment please go through by our previous OSGi fragment posts.

Once we have the clear picture about fragment and you have opted the host bundle to register the fragment then, follow the below steps to create OSGi fragment project. For example we have a sample OSGi bundle with name "OSGitestBundle" and for this bundle we will create an OSGi fragment which helps this bundle to work as an extension of host bundle and provide additional information to host bundle. 

Step 1: Go to File >> New >> Other >> Plug-in Development >> Fragment Project and then click on the next button. 

Select OSGi fragment project from other project section in Eclipse

Step 2: Now put a valid name OSGi fragment name in Project name text-box, and click on the next button. for example we have given project  name OSGiFragment

OSGI fragment project name
OSGi fragment project name


Step 3: In this step you will see, few fields are auto filled with the name of your OSGi fragment project, as you have given the project name in the previous step. In this step you have to add the plug-in ID information or host name information of this fragment, so this get merge with host bundle. here we will put the project name OSGitestBundle and then click on the finish button.

Plug in or host name information OSGi fragment

Step 4: Now open the project explorer in your Eclipse and open the manifest file "MANIFEST.MF" at location [Fragment-PROJECT-NAME] >> META-INF >> MANIFEST.MF
Manifest file stored at directory
Manifest file location


In manifest file you will see the following entries:

Manifest-Version: 1.0
Bundle-ManifestVersion: 2
Bundle-Name: OSGiFragmen
Bundle-SymbolicName: OSGiFragmen
Bundle-Version: 1.0.0.qualifier
Fragment-Host: OSGitestBundle
Automatic-Module-Name: OSGiFragment
Bundle-RequiredExecutionEnvironment: JavaSE-1.8

Here Fragment-Host will hold the host bundle name.

OSGi fragment bundle

What is OSGi fragment?

OSGi fragment is the java archive file or jar file or bundle, which have some classes, resource and header. The purpose of fragment to develop an extension of a bundle, which add on additional functionality and merge those functionality with host bundle at the time of host bundle is getting resolve. Before host bundle get resolved fragment appended to host. Following are the key points which we need to keep in mind while working with OSGi fragment.


  • Fragment is treated as part of the host bundles. 
  • A fragment cannot have its own class loader or bundle activator. 
  • Fragment bundle cannot override the information present in the host bundles. 
  • Both host and fragment share the same class loader from host bundle. 
  • An OSGi fragment doesn't have it life-cycle and that means we can't activate, start, stop a fragment. 
  • All classes and definition of fragment are merged with host definition when the host bundle get resolved. If the fragment dependencies cannot be resolved, the fragment does not attach to the host bundle. 
  • If any information from host and fragment conflicts then fragment will not attach and merge with host bundle. 
  • Fragments extend host bundles with resources, classes, and permitted headers. 
  • Fragments can only add new files, and does not replace or override existing files from host. 
  • OSGi fragment JAR file contains manifest file which have host bundle information. 
  • Fragment jar cannot be use independently. 
  • Fragments bundles could you attached with one or many host bundles. 


Why do we have fragments and what is the role of fragments and why we use? 


  • To provide the extra classes or additional functionality to host bundle. 
  • Add configuration files and properties.

You can create a fragment project using eclipse.

To create an OSGi fragment project in Eclipse follow the below steps:
  1. Go to File >> New >> Other >> Plug-in Development >> Fragment Project
  2. Select Fragment project and click on the next.
  3. Put a valid project name for your fragment and then click on next button.
  4. Now under the Host plun-in section, put the host bundle name in plug-in ID field.

Here is the complete step by step guide to create an OSGi fragment project using Eclipse. >> https://rashidjorvee.blogspot.com/2019/03/how-to-create-osgi-fragment-project.html

Find minimum and maximum number from a given array

This is an example code snippet to find the minimum and maximum number in a given Array using Java programming. 


 1
 2
 3
 4
 5
 6
 7
 8
 9
10
11
12
13
14
15
16
import java.util.Scanner;

public class FindMinMaxInArray {

    public static void main(String[] args) {
        int nums[]=new int[]{3, 5, 6, 2, 4, 15, 120};
        int max = 0, min= 0;
        max = min = nums[0]; 
        for (int i = 1; i < nums.length; i++) {
            if(nums[i]>max) max = nums[i];
            if(nums[i]<min) min = nums[i];
        }
        System.out.println("Minimum number is "+min + "\nMaximum number is "+max);
       
    }
}

Output:

Minimum number is 2
Maximum number is 120

Related articles:

Difference between == and === in JavaScript

In this post we will see what is the difference between double equals(==) and triple equals(===) compare operator in JavaScript program. 

Double equals (==) 

Double equals compare two values and return true when those values have exactly same text and should be in same case. Please note values are case sensitive in javascript. 
e.g. var a = "Rashid";

       var b = "rashid";
       a==b // It will return false since both the values are not in the same case.

Triple equals (===) 

Triple equals compare two values as well as it also compare the datatype of those value, and return true when both the things (text and datatype) of those values get matched with other value.
e.g. var c = 7;

       var d = "7";
       c===d // it will return false; since c stored a numeric value and d stored a string value hence datatype didn't match for those values.

Compare values ignoring case 

You can also compare the values in javascript by ignoring the case sensitive. To do that first we have to convert given values in either lowerCase or upperCase by using the toUpperCase() or toLowerCase function.
e.g. var a = "Rashid";

       var b = "rashid";
       a.toUpperCase()==b.toUpperCase() // It will return true 

Code snippet

Below is the complete code snippet which you could refer to practice double equals(==) and triple equals(===) in javaScript.

If you face any issue please fill free to ask your question in comment section.

 1
 2
 3
 4
 5
 6
 7
 8
 9
10
11
12
13
14
15
16
17
18
19
20
21
22
23
24
25
26
27
28
29
<html>
<head>
    <title>Cpmpare values using == and ===</title>
    <script type="text/javascript">
     var a = "Rashid";
     var b = "rashid";
     var c = 7;
     var d = "7";
     document.writeln("Result of a==b, where a="+a +" b="+b +"::  ");
     document.write(a==b);
     document.write("<br />")
     document.writeln("Result of a===b, where a="+a +" b="+b +"::  ");
     document.writeln(a===b);
     document.write("<br />")
     document.writeln("Result of a===b with toUpperCase, where a="+a +" b="+b +"::  ");
     document.writeln(a.toUpperCase() === b.toUpperCase());
     document.write("<br />")
     document.writeln("Result of c==d, where a="+c +" b="+c +"::  ");
     document.writeln(c==d);
     document.write("<br />")
     document.writeln("Result of c===d, where a="+c +" b="+c +"::  ");
     document.writeln(c===d);
     document.write("<br />")
    </script>
</head>
<body>
<span>This code snippet is copyright with rashidjorvee.blogspot.com.</span>    
</body>
</html>

Output

Result of a==b, where a=Rashid b=rashid:: false
Result of a===b, where a=Rashid b=rashid:: false
Result of a===b with toUpperCase, where a=Rashid b=rashid:: true
Result of c==d, where a=7 b=7:: true
Result of c===d, where a=7 b=7:: false 

Recursive method in Java

How to write a recursive method in Java?

Below is the code snippet of a recursive method in Java to generate numbers and check the number and execute the method again. In the below example printNumber() is a recursive method that will get called inside its own body.

 1
 2
 3
 4
 5
 6
 7
 8
 9
10
11
12
13
14
15
16
17
18
19
20
21
22
23
package rashidjorvee;

public class RecursiveMethod {

 public static void main(String[] args) {

  RecursiveMethod recursiveMethod=new RecursiveMethod();
  recursiveMethod.printNumber(2);

 }
 private void printNumber(int j) {
  try {
   int i=j; 
    if(i==2) {
     printNumber(4);
    }
    System.out.println("Number "+i);
    }
  catch(Exception e) {

  }
 }
}

How to create session from resourceResolver object?

Sometimes we need a session to work with some special JCR API which we can,t use with the help of resourceResolver then we can create an instance of a session in the same class file using the object of resourceResolver. Below is the code snippet.

First, we need to inject the ResourceResolverFactory interface to create a new resourceResolver in AEM. You could inject using the SCR annotation @Reference or Sling Model annotation @Inject.
@Reference
private ResourceResolverFactory resolverFactory;
Now create the ResourceResolver object using resourceResolverFactory. This line of code will create a rsourceResolver with administrator login.
ResourceResolver resourceResolver=resolverFactory.getServiceResourceResolver(null);
Now will create the instance of Session using the object of resourceResolver.
Session session = resourceResolver.adaptTo(Session.class);

How to run a Java Application or program without main method?

Below is the code snippet to execute and run a java program without main method.


 1
 2
 3
 4
 5
 6
 7
 8
 9
10
11
package rashid.jorvee;

import javafx.stage.Stage;

public class RunAJavaApplicationWithoutMainMethod extends javafx.application.Application {
 
 @Override
 public void start(Stage primaryStage) throws Exception {
  System.out.println("Running Application!!!");
 }
}

trimToSize() in Java

trimToSize() method used to reduce the capacity of the ArrayList, StringBuffer and StringBuilder in Java. Trims the capacity of the instance(ArrayList, StringBuffer and StringBuilder) to be the list's current size. An application can use this operation to minimize the storage of those instances.
Let understand this method using a scenario, for example, we have created a StringBuffer and assign some value into it. suppose we have put "trim to size method in java" string into it. And when you will pull the length of the StringBuffer then it will return the actual size of the string, which, we have assign into it, in our case, it will return 27. But when you will fetch the capacity if the StringBuffer then it will give you output more than the length of StringBuffer, in our case it is returning 34. This means this Buffer has more capacity and could store more data into it. Since our text has the length of 27, and we don't want that extra capacity anymore in our instance then we could remove and free the extra capacity from that instance using trimToSize method. And this method will trim the capacity of an instance with the size or length of the instance.  

Here is an example code of trimToSize() method with StringBuffer

Output:
trim to size method in java, and length of StringBuffer copyText is:27
Capacity of copyText is::34
trim to size method in java, and length of StringBuffer copyText after trimToSize() is:27
Capacity of copyText after trimToSize() is::27

How to iterate on a JSON objects using Java

Today we are going to see how to iterate on a JSON object or read a JSON file and fetch key and value from that JSON file using Java.

Below is the example code snippet.


 1
 2
 3
 4
 5
 6
 7
 8
 9
10
11
12
13
14
15
16
17
18
19
20
21
22
23
24
25
26
27
28
29
30
31
32
33
34
35
36
37
38
39
40
41
42
43
44
45
46
47
48
49
50
51
52
53
54
55
56
57
58
59
60
61
62
63
64
65
66
67
68
69
70
71
72
73
74
75
76
77
78
79
80
81
82
package rashidjorvee;

import java.io.FileReader;

import org.json.simple.JSONArray;
import org.json.simple.JSONObject;
import org.json.simple.parser.JSONParser;
public class JsonReader {
 /* JSON data file
  * [
    {
      "componentName": "comp1""compKey": [
        {
          "keyname": "json_key1",
          "props": [
            {
              "fieldLabel": "Jorvee",
              "name": "./productProperty",
              "id": "productID",
              "sling:resourceType": "granite/ui/components/foundation/form/textfield"
            }
          ]
        }
      ]
    },
    {
      "componentName": "comp2""compKey": [
        {
          "keyname": "json_key2",
          "props": [
            {
              "fieldLabel": "Rashid",
              "name": "./productProperty",
              "id": "productID",
              "sling:resourceType": "foundation/components/parsys"
            }
          ]
        }
      ]
    }
  ]
  */
 public static void main(String[] args) {
  try{
   JSONParser parser=new JSONParser();
   JSONArray a = (JSONArray) parser.parse(new FileReader("D:\\json/jsonFile.json"));
   for (Object comp:a) {
    JSONObject key1 = (JSONObject) comp;
    String componentName = (String) key1.get("componentName");
    System.out.println("componentName: "+componentName);
    JSONArray compkeys = (JSONArray) key1.get("compKey");
    for (Object o : compkeys)
    {
     JSONObject key = (JSONObject) o;
     String keyName = (String) key.get("keyname");
     System.out.println("KeyName: "+keyName);
     
     JSONArray keys = (JSONArray) key.get("props");
     for (Object prop : keys) {
      JSONObject properties = (JSONObject) prop;
      
      String name = (String) properties.get("name");
      System.out.println("Name: " +name);
      
      String fieldLabel = (String) properties.get("fieldLabel");
      System.out.println("City: "+fieldLabel);
      
      String job = (String) properties.get("sling:resourceType");
      System.out.println("resourceType: "+job);
      
      String id = (String) properties.get("id");
      System.out.println("ID: "+id);
      
     }
     System.out.println("\n");
    }
   }
  } catch(Exception e) {}

 }

}