Menu

Showing posts with label Tutorial. Show all posts

How to configure server to listen TCP/IP port on Microsoft SQL Server?

In this article we will look how to configure or enable SQL Server database engine to listen to a particular port.
1. Open MS sql server configuration manager
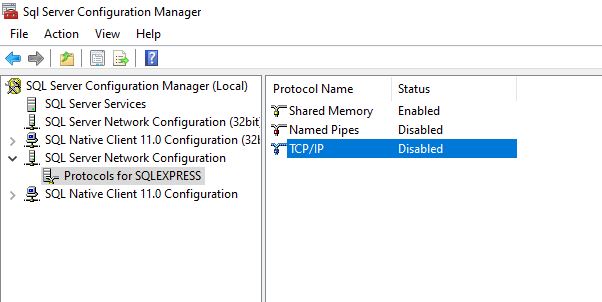
Goto  SQL server Network Configuration section >> Open protocol for SQLSERVER 
You will see Protocol TCP/IP is showing in Disabled status. By default it is disabled.  

MS SQL Server Configuration Manager
SQL Server Configuration Manager
2. Enable the TCP IP port 
Default it will be Disabled, we have to enable it to listen a server request.
  a. Double click on the TCP/IP option, a new window will appear.
  b. From Protocol tab Select the Enabled value as Yes.

Enable TCP/IP in MS SQL Server
Enable TCP/IP in SQL Server
3. Open the IP Address tab now. Here you will find few IP<n>, and you need to enable the right one and configure with write port.
Here, we will enable our localhost server request on port number 1433. 1433 is default port for MS sql server, which you may change as your wish. Configure the following values here.
Active = Yes

Enabled = Yes
IP Address = 127.0.0.0
TCP Dynamic Ports = <keep it empty>. Default you may find 0 here, please remove the value 0.
TCP Port = 1433
  After making all these changes hit on apply button.
Configure TCP IP properties in MS SQL SERVER

4. If you not sure about the request server and your application is unable to listen to configured IPn, then please update the IPAll section at the end of this IPs with same port number 1433.
IPALL MS SQL Server Configuration TCP/IP
IPALL MS SQL Server Configuration TCP/IP 

Note: These changes will not work until and unless we restart the SQL services. To restart the services. Again go to MS SQL server configuration manager.
Open SQL Server Configuration Manger >> click on SQL Server Service >> SQL Server (SERVER NAME) >> Right click on that and select the restart option.


Clear script cache in AEM


At some point you may face the issue where your AEM page is not getting loaded and following errors getting printed in error log file.


Errors:

*ERROR* [182.75.136.107 [1589236795135] GET /content/jorvee/tools/en_us/gen-tool-10-10.html HTTP/1.1] com.day.cq.wcm.core.impl.WCMDeveloperModeFilter Error during include of SlingRequestPathInfo: path='/content/jorvee/tools/en_us/gen-tool-10-10/jcr:content', selectorString='null', extension='html', suffix='null'org.apache.sling.api.SlingException: Cannot get DefaultSlingScript: java.io.IOException: java.util.concurrent.TimeoutException: Idle timeout expired: 60000/60000 ms

OR 

*ERROR* [0:0:0:0:0:0:0:1 [1531894023650] GET /content/we-retail/us/en/user/smartlist.html HTTP/1.1] com.day.cq.wcm.core.impl.WCMDeveloperModeFilter Error during include of SlingRequestPathInfo: path='/content/jorvee/tools/en_us/gen-tool-10-10/jcr:content', selectorString='null', extension='html', suffix='null'
org.apache.sling.api.SlingException: Cannot get DefaultSlingScript: Identifier com.adobe.cq.wcm.core.components.models.Page cannot be correctly instantiated by the Use API


Resolution:

To solve this issue we need to clear the cached HTML and JS files from AEM.

Solution 1:


Browse the "Adobe Experience Manager Web Console Script Cache Status" http://localhost:4502/system/console/scriptcache
at the bottom of the page there is a "Clear Cache" button, click on the button to clear all the above listed cached scripts. You may also clear one by one if you doesn't want to clear all of them. To remove the individual script click on the remove button next to that script in right.

Adobe Experience Manager Web Console Script Cache Status

Solution 2:

Restart your AEM environment.

Failed to collect dependencies mule-core-ee:jar:3.8.4


Few times I faced this issue, while working with Mule 3.8.4. When I Googled I found people are talking about the Mulesoft Enterprise Edition access to download these dependencies for project, but I don't think we need nexus EE access to download these dependencies specially when we are working with Mule 3. Here the problem is something different and your POM might have some additional dependencies which is not available on public nexus repository and due to that this dependency is not getting resolved.

Failed to collect dependencies at com.mulesoft.muleesb:mule-core-ee:jar:3.8.4: Failed to read artifact descriptor for com.mulesoft.muleesb:mule-core-ee:jar:3.8.4: Could not transfer artifact com.mulesoft.muleesb:mule-core-ee:pom:3.8.4 from/to Central (http://repo1.maven.org/maven2/): Failed to transfer file http://repo1.maven.org/maven2/com/mulesoft/muleesb/mule-core-ee/3.8.4/mule-core-ee-3.8.4.pom with status code 501


Resolution:

To resolve this in Mule 3 Anypoint studio, create a new fresh maven project and build it. If this newly created project successfully build then your other project where you are facing this issue will work. Match the project POM.xml file with new project pom and see the dependencies.

Example POM.xml file.

How to change default port for Spring boot

Default port for Spring boot application is 8080, what if someone want to run their application other than port 8080 or other than default port. Where we need to put the port setting in project, so instead of default port 8080 Spring boot application start on port which we configure.

By Default Spring boot run on port 8080 and no where in your project you will find the port setting, if you just started a new Spring boot project. If you want to change the default port then you have to add the port setting in your project.

Where to put the port setting?

We need to add port setting in projects application.properties file. You will find this properties file under project directory > src > main > resources > application.properties

open application.properties file and add a new property server.port followed by port number. below is the example.
server.port = 8020

How to delete commits from a branch in Git?

Checkout the branch. e.g we are working here with development branch
$ git checkout development

Go to the commits list and copy the commit id till where you want to remove the commits from branch. then run git reset --hard to delete the all commits above or after that commit id. e.g. commit id is "c9709eb155e18e2eb12e38bf
$ git reset --hard c9709eb155e18e2eb12e38bf

You will got a success message saying "HEAD is now at <commitid> <commit message>". It means your reset is successful.

Now run the git push to push the commit till this commit id to your branch.
$ git push origin development --force


Related Articles:

How to cherry pick in Git 

Port may already be in use

While running any application you may face an issue, that default port or port which our application required to start the process is occupied by some other process or service. In this article we will see how to fix this issue and how we can terminate the active process and service from that port and make it available for our new application. 
below are the steps which we need to follow for windows machine to free the port number.

Error log:

2019-11-22 23:38:18.329 ERROR 27240 --- [  restartedMain] o.apache.catalina.core.StandardService   : Failed to start connector [Connector[HTTP/1.1-8080]]

org.apache.catalina.LifecycleException: Failed to start component [Connector[HTTP/1.1-8080]]
at org.apache.catalina.util.LifecycleBase.start(LifecycleBase.java:167) ~[tomcat-embed-core-8.5.29.jar:8.5.29]
at org.apache.catalina.core.StandardService.addConnector(StandardService.java:225) ~[tomcat-embed-core-8.5.29.jar:8.5.29]
at org.springframework.boot.web.embedded.tomcat.TomcatWebServer.addPreviouslyRemovedConnectors(TomcatWebServer.java:256) [spring-boot-2.0.1.RELEASE.jar:2.0.1.RELEASE]
at org.springframework.boot.web.embedded.tomcat.TomcatWebServer.start(TomcatWebServer.java:198) [spring-boot-2.0.1.RELEASE.jar:2.0.1.RELEASE]
at org.springframework.boot.web.servlet.context.ServletWebServerApplicationContext.startWebServer(ServletWebServerApplicationContext.java:300) [spring-boot-2.0.1.RELEASE.jar:2.0.1.RELEASE]
at org.springframework.boot.web.servlet.context.ServletWebServerApplicationContext.finishRefresh(ServletWebServerApplicationContext.java:162) [spring-boot-2.0.1.RELEASE.jar:2.0.1.RELEASE]
at org.springframework.context.support.AbstractApplicationContext.refresh(AbstractApplicationContext.java:553) [spring-context-5.0.5.RELEASE.jar:5.0.5.RELEASE]
at org.springframework.boot.web.servlet.context.ServletWebServerApplicationContext.refresh(ServletWebServerApplicationContext.java:140) [spring-boot-2.0.1.RELEASE.jar:2.0.1.RELEASE]
at org.springframework.boot.SpringApplication.refresh(SpringApplication.java:759) [spring-boot-2.0.1.RELEASE.jar:2.0.1.RELEASE]
at org.springframework.boot.SpringApplication.refreshContext(SpringApplication.java:395) [spring-boot-2.0.1.RELEASE.jar:2.0.1.RELEASE]
at org.springframework.boot.SpringApplication.run(SpringApplication.java:327) [spring-boot-2.0.1.RELEASE.jar:2.0.1.RELEASE]
at org.springframework.boot.SpringApplication.run(SpringApplication.java:1255) [spring-boot-2.0.1.RELEASE.jar:2.0.1.RELEASE]
at org.springframework.boot.SpringApplication.run(SpringApplication.java:1243) [spring-boot-2.0.1.RELEASE.jar:2.0.1.RELEASE]
at jobtrees.JobTreesApplication.main(JobTreesApplication.java:25) [classes/:na]
at sun.reflect.NativeMethodAccessorImpl.invoke0(Native Method) ~[na:1.8.0_221]
at sun.reflect.NativeMethodAccessorImpl.invoke(Unknown Source) ~[na:1.8.0_221]
at sun.reflect.DelegatingMethodAccessorImpl.invoke(Unknown Source) ~[na:1.8.0_221]
at java.lang.reflect.Method.invoke(Unknown Source) ~[na:1.8.0_221]
at org.springframework.boot.devtools.restart.RestartLauncher.run(RestartLauncher.java:49) [spring-boot-devtools-2.0.1.RELEASE.jar:2.0.1.RELEASE]
Caused by: org.apache.catalina.LifecycleException: Protocol handler start failed
at org.apache.catalina.connector.Connector.startInternal(Connector.java:1020) ~[tomcat-embed-core-8.5.29.jar:8.5.29]
at org.apache.catalina.util.LifecycleBase.start(LifecycleBase.java:150) ~[tomcat-embed-core-8.5.29.jar:8.5.29]
... 18 common frames omitted
Caused by: java.net.BindException: Address already in use: bind
at sun.nio.ch.Net.bind0(Native Method) ~[na:1.8.0_221]
at sun.nio.ch.Net.bind(Unknown Source) ~[na:1.8.0_221]
at sun.nio.ch.ServerSocketChannelImpl.bind(Unknown Source) ~[na:1.8.0_221]
at sun.nio.ch.ServerSocketAdaptor.bind(Unknown Source) ~[na:1.8.0_221]
at org.apache.tomcat.util.net.NioEndpoint.bind(NioEndpoint.java:210) ~[tomcat-embed-core-8.5.29.jar:8.5.29]
at org.apache.tomcat.util.net.AbstractEndpoint.start(AbstractEndpoint.java:1150) ~[tomcat-embed-core-8.5.29.jar:8.5.29]
at org.apache.coyote.AbstractProtocol.start(AbstractProtocol.java:591) ~[tomcat-embed-core-8.5.29.jar:8.5.29]
at org.apache.catalina.connector.Connector.startInternal(Connector.java:1018) ~[tomcat-embed-core-8.5.29.jar:8.5.29]
... 19 common frames omitted

2019-11-22 23:38:18.343  INFO 27240 --- [  restartedMain] o.apache.catalina.core.StandardService   : Stopping service [Tomcat]
2019-11-22 23:38:18.362  INFO 27240 --- [  restartedMain] ConditionEvaluationReportLoggingListener : 

Error starting ApplicationContext. To display the conditions report re-run your application with 'debug' enabled.
2019-11-22 23:38:18.364 ERROR 27240 --- [  restartedMain] o.s.b.d.LoggingFailureAnalysisReporter   : 

***************************
APPLICATION FAILED TO START
***************************

Description:

The Tomcat connector configured to listen on port 8080 failed to start. The port may already be in use or the connector may be misconfigured.

Action:

Verify the connector's configuration, identify and stop any process that's listening on port 8080, or configure this application to listen on another port.

How to fix?

To fix this issue and vacant the port you have to kill and stop the current service which is active and running on this port. to do so in your windows machine please follow the following steps.
Step1: Open command prompt(CMD).
Step2: Find the process ID which occupied the port. run the below command to find the PID. to know more on this you may refer our aticle find PID using port number.
netstat -aon | findstr <port number>
let say we want to find the active process ID which is running on port number 4502, hence we will run the below command. 
netstat -aon | findstr 4502
How to find process ID
Find process ID(PID)

Step3: after getting the process ID (PID) you may need to verify which service name or want to know the name of service, then execute the below command.
tasklist /fi "pid eq 8884"
Here, image name is the name of the service. 
How to find the service name using PID
Service name

Step4:
Now we need to stop or kill this active service so we could use another service on same port. To kill a service please run the below command.

taskkill /PID 8884 /F
How to remove an active service from a port.
kill active process/service

We have killed the process and service has been terminated it means now port 4502 is empty and no process or service is currently using that port. We may verify the same by running the command from step2 again.

if you have any query and suggestion, please feel free to pass.


How to cherry pick multiple commits from a branch to other?

It is very common practice to pull push and merge the changes from one branch to other branch for developer. Today we are going to see how we could cherry pick changes from one branch to other branch or from feature or working branch to master. Some times we come at a situation where we do not want to merge the complete branch into another branch, instead of complete merge or pull we just want to merge few commits from one branch to another, for that we have cherry pick option in git.

for example we are currently working on branch feature/fix01, and n commits are available on fix01 branch.
Now we want to cherry pick only commit A and B to master branch. to do so, please do the following steps.

Step 1: Open git bash.
git checkout fix01
git log
 $git log command will show all commits, with commit details. From here you can take the commit ID. Alternate to get the commit ID is from git UI, check for the commit SHA. As shown in below screenshot.

 
Step 2: Now checkout the master branch where we need to push the commits.
git checkout master
Step 3: Now run the cherry pick command
git cherry-pick a001 b001 // here a001 and b001 is commit IDs for A and B commit respectively.
if cherry-pick command didn't run successfully and halted due to some conflict, then go to repo and fix the conflicts and then came back to git bash and run the cherry-pick continue command.
git cherry-pick --continue

if you want to stop the cherry-pick or end the process, then run cherry-pick abort command.
git cherry-pick --abort

Step 4: If you cherry-pick was successful then run the git push to move the commits.
git push origin master/master
Step 5: Verify the changes.

References:


Building blocks in AEM

Building blocks is the feature associated with experience fragment in which we group two or more experience fragment together.
To understand it better we have to first understand the experience fragment. Experience fragment is a page or post, which we create using multiple small contents or grouping multiple content together in a template so we can easily reuse and publish that content. Experience fragment can have CTA(cal to action), images, text and inputs.

Why building blocks required?

Suppose we have a requirement where we need to show two or more experience fragment together as a single experience fragment, then using the building blocks we can group those experience fragment and  drop and show that building blocks as a single experience fragment in your post and page.

To make it more simple, building blocks is for combining two or more experience fragment into a single experience fragment.

How to create building blocks?


Failure authenticating with BASIC 'Sling (Development)'

Issue: When we try to replicate anything from author to publisher I am getting below error. and not even on any replication it keep printing the log in error.log file automatically after an interval. What could be the cause of this? 


24.10.2019 11:31:05.942 *INFO* [oak-repository-executor-1] com.adobe.granite.repository Service [34344, [org.apache.jackrabbit.oak.api.jmx.SessionMBean]] ServiceEvent REGISTERED
24.10.2019 11:31:20.180 *INFO* [sling-default-2812-com.day.cq.replication.impl.ReverseReplicator.22529] org.apache.commons.httpclient.auth.AuthChallengeProcessor basic authentication scheme selected
24.10.2019 11:31:20.180 *INFO* [sling-default-2812-com.day.cq.replication.impl.ReverseReplicator.22529] org.apache.commons.httpclient.HttpMethodDirector Failure authenticating with BASIC 'Sling (Development)'@localhost:4503
24.10.2019 11:31:24.323 *INFO* [oak-repository-executor-1] com.adobe.granite.repository Service [34345, [org.apache.jackrabbit.oak.api.jmx.SessionMBean]] ServiceEvent REGISTERED


Resolution: This error message you are getting because, AEM author replication agent is unable to communicate with publisher instance due to bad credential (username and password). You might change the password of admin user in publisher and forget to update the password on default author agent. Once you will update the valid authentication credential in default author replication agent this error will be no more logged in the error.log file.

By default AEM system keep generating events and try to transport the same to publisher instance, every time it send the replication request to replication agent the authentication get failed thats why this log is get printed after a certain interval. 

Reference:

  1. https://helpx.adobe.com/in/experience-manager/6-3/sites/deploying/using/replication.html

How to put escape character in SQL query


SELECT * FROM SQL_TUTORIAL WHERE SQL_NAME like UPPER('%'||vSearchItem||'%')

Create a calculator using JavaScript callback function.

In this post we are going to create a calculator using simple HTML and JavaScript callback function. Using callback functions we have to write less code in compare to writing huge line of code using simple JavaScript functions. Callback and promises are the very useful and fastest way to write the code.

Without any further delay, lets start the coding to create a web based simple calculator using the javaScript callback functions. We will discuss the theory part of callback function and promises other article.

Create a html page with name calculator.html. copy the below code snippet and paste in calculator.html file.

 1
 2
 3
 4
 5
 6
 7
 8
 9
10
11
12
13
14
15
16
17
<html>
<title>Calculator</title>
    <head>
        <script src="js/calculator.js"></script>
    </head>
<body>
<h3>Calculator</h3>
Number 1: <input id="number1" type="number"/><br /><br />
Number 2: <input id="number2" type="number"/><br /><br />
<input type="button" onclick="calc(addNum)" value="Add" id="add" />
<input type="button" value="Multiply" onclick="calc(multiplyNum)" id="multiply" />
<input type="button" value="Divide" id="divide" onclick="calc(divideNum)" />
<br /><br />
Result: <input id="result" type="number"/><br />
</body>

</html>

Now create a folder with name js in the same directory where you have created your html page, this js folder is to separate the js file from other files.

Now open the js folder and create a calculator.js file.

Copy the below js code snippet the paste it in your calculator.js file.


 1
 2
 3
 4
 5
 6
 7
 8
 9
10
11
12
13
14
15
16
function calc(callback) {
    var n1 = parseFloat(document.getElementById("number1").value);
    var n2 = parseFloat(document.getElementById("number2").value);
    var result = callback(n1, n2);
    document.getElementById("result").value = result;
}

function multiplyNum(n1, n2) {
    return n1 * n2;
}
function divideNum(n1, n2) {
    return n1 / n2;
}
function addNum(n1, n2) {
    return n1 + n2;
}

Now open your calculator.html file in browser and see the result. below is the screen shot of the calculator.

callback function calculator-rashidjorvee
callback function calculator

You may download the complete exercise from GitHub https://github.com/RashidJorvee/callbackFunctionJS

New Features in JAVA10

JAVA 10 NEW FEATURES

1. Local Variable Type Inference
2. Time-Based Release Versioning
3. Garbage-Collector Interface
4. Parallel Full GC for G1
5. Heap Allocation on Alternative Memory Devices
6. Consolidate the JDK Forest into a Single Repository
7. Root Certificates
8. Experimental Java-Based JIT Compiler
9. Thread-Local Handshakes
10. Remove the Native-Header Generation Tool


Oracle Java 10
 

Environment variable What, Why, Where and How?

What is environment variable?

Environment variable is variable which holds the path of the software installed in your machine.

Why do we need to set environment variable?

When we compile and run any program, then machine try to find the required compiler or runtime to perform the action which we have requested. So either we to have to specify the directory of the software library every time with our command or we could set it into an environment variable so machine can automatically pickup the library path from there based on the command.
For example:
We set python variable to compile and execute the Python code.
python = C:\Python\Python27\python.exe
We set the JAVA_HOME for compile and run the Java programs.
JAVA_HOME = C:\Program Files\Java\jdk1.8.0_201 
We set MVN_HOME for maven build.
MVN_HOME = D:\apache-maven-3.6.0\bin 

Instead of creating all these variable we could also just add these library paths in a common user variable PATH and later add PATH variable in system variable CLASSPATH.

How to set environment variable?

Right click on my computer icon and select the properties option.

A new window will be get opened. Now click on the advance system settings
advance-system-settings-environment-variable

Now click on the environment variables button.
environment-variables
Now here you could either add the installed library path under the PATH user variable to you could create a new user variable and later add the newly create variable in CLASSPATH system variable.
environment-variable-paths.JPG

Error: Can't find Python executable "python", you can set the PYTHON env variable.

This error you are getting because npm need Python and your computer doesn't have Python install into it.
So please go ahead and install the Python in your machine, and run the npm install command after installing the Python. 

How to install python?

Go to the Python official website and download the latest release of Python, and simple install it.
Once installation has been successfully completed, then set the python variable in your machine environment variable. To know more, you could see our blog on How to set an environment variable in windows.

Or you could set the variable using this command.
npm config set python C:\Python\Python27\python.exe
If you don't wants to install Python manually and wants all things to be get downloaded by npm itself then you could run npm install -g windows-build-tools, this will download all the required dependencies for you and bring npm in working mode.
To run this command please make sure you have open your node command prompt and cmd with administrative privilege. To do so, go to start and search for node cmd and cmd >> then right click on the application shortcut and use the option run as administrator.
after that just copy and paste the command
npm install -g windows-build-tools

This command will download the Python and install the Python at the below directory in your machine. Go to this path and find the python.exe and set environment variable in CLASSPATH variable.
C:\Users\nodejs\.windows-build-tools\python27\

Responsive and rich accordion design

Responsive and rich accordion design using HTML and CSS:

<html>
<head>
<meta name="viewport" content="width=device-width, initial-scale=1">
<style>
.accordion {
  background-color: #A678CF;
  color: white;
  cursor: pointer;
  padding: 18px;
  width: 100%;
  border: none;
  text-align: left;
  outline: none;
  font-size: 15px;
  transition: 0.4s;
  border-top: 1px dotted #0069b9;
  margin: 5px 0 0 5px;
}

.accordion:before {
  content: '>';
  color: white;
  font-weight: bold;
  float: left;
  margin-right:10px;
  margin-left: 0px;
}

.active:before {
  content: "^";
}
.active, .accordion:hover {
  background-color: green; 
}

.panel {
  padding: 0px 18px;
  margin-left: 25px;
  margin-right: -5px;
  display: none;
  background-color: green;
  overflow: hidden;
  color: white;
}
</style>
</head>
<body>

<h2>Accordion</h2>

<button class="accordion">Section 1</button>
<div class="panel">
  <p>Lorem ipsum dolor sit amet, consectetur adipisicing elit, sed do eiusmod tempor incididunt ut labore et dolore magna aliqua. Ut enim ad minim veniam, quis nostrud exercitation ullamco laboris nisi ut aliquip ex ea commodo consequat.</p>
</div>

<button class="accordion">Section 2</button>
<div class="panel">
  <p>Lorem ipsum dolor sit amet, consectetur adipisicing elit, sed do eiusmod tempor incididunt ut labore et dolore magna aliqua. Ut enim ad minim veniam, quis nostrud exercitation ullamco laboris nisi ut aliquip ex ea commodo consequat.</p>
</div>

<button class="accordion">Section 3</button>
<div class="panel">
  <p>Lorem ipsum dolor sit amet, consectetur adipisicing elit, sed do eiusmod tempor incididunt ut labore et dolore magna aliqua. Ut enim ad minim veniam, quis nostrud exercitation ullamco laboris nisi ut aliquip ex ea commodo consequat.</p>
</div>

<script>
var acc = document.getElementsByClassName("accordion");
var i;

for (i = 0; i < acc.length; i++) {
  acc[i].addEventListener("click", function() {
    this.classList.toggle("active");
    var panel = this.nextElementSibling;
    if (panel.style.display === "block") {
      panel.style.display = "none";
    } else {
      panel.style.display = "block";
    }
  });
}
</script>

</body>
</html>

Accordion component using HTML and CSS
Accordion component

Accordion using simple html and css

In this tutorial we are going to create an accordion just using the simple HTML, JavaScript and CSS, as shown below Accordion example picture.

simple accordion example
Accordion example
Here is the complete code snippet which we could use to design the same accordion as shown above.

 1
 2
 3
 4
 5
 6
 7
 8
 9
10
11
12
13
14
15
16
17
18
19
20
21
22
23
24
25
26
27
28
29
30
31
32
33
34
35
36
37
38
39
40
41
42
43
44
45
46
47
48
49
50
51
52
53
54
55
56
57
58
59
60
61
62
63
64
65
66
67
68
69
70
71
72
73
74
75
76
77
78
79
80
81
82
83
84
85
<html>
<head>
<meta name="viewport" content="width=device-width, initial-scale=1">
<style>
.accordion {
  background-color: chartreuse;
  color: #444;
  cursor: pointer;
  padding: 18px;
  margin: 5px 0px 0 5px;
  width: 100%;
  border-top: 1px dotted #0069b9;
  text-align: left;
  
  outline: none;
  font-size: 15px;
  transition: 0.4s;
  transform: skew(-20deg);
}

.active, .accordion:hover {
  background-color: #ccc;
}

.accordion:before {
  content: '\002B';
  color: #777;
  font-weight: bold;
  float: left;
  margin-right:10px;
  margin-left: 0px;
}

.active:before {
  content: "\2212";
}

.panel {
  padding: 0 18px;
  background-color: white;
  max-height: 0;
  overflow: hidden;
  transition: max-height 0.2s ease-out;
}
</style>
</head>
<body>

<h2>Accordion with symbols</h2>
<p>In this example we have added a "plus" sign to each button on the left side of the accordion section. When the user clicks on the button, the "plus" sign is replaced with a "minus" sign.</p>
<button class="accordion">Accordion 1</button>
<div class="panel">
  <p>Lorem ipsum dolor sit amet, consectetur adipisicing elit, sed do eiusmod tempor incididunt ut labore et dolore magna aliqua. Ut enim ad minim veniam, quis nostrud exercitation ullamco laboris nisi ut aliquip ex ea commodo consequat.</p>
</div>

<button class="accordion">Accordion 2</button>
<div class="panel">
  <p>Lorem ipsum dolor sit amet, consectetur adipisicing elit, sed do eiusmod tempor incididunt ut labore et dolore magna aliqua. Ut enim ad minim veniam, quis nostrud exercitation ullamco laboris nisi ut aliquip ex ea commodo consequat.</p>
</div>

<button class="accordion">Accordion 3</button>
<div class="panel">
  <p>Lorem ipsum dolor sit amet, consectetur adipisicing elit, sed do eiusmod tempor incididunt ut labore et dolore magna aliqua. Ut enim ad minim veniam, quis nostrud exercitation ullamco laboris nisi ut aliquip ex ea commodo consequat.</p>
</div>

<script>
var acc = document.getElementsByClassName("accordion");
var i;

for (i = 0; i < acc.length; i++) {
  acc[i].addEventListener("click", function() {
    this.classList.toggle("active");
    var panel = this.nextElementSibling;
    if (panel.style.maxHeight){
      panel.style.maxHeight = null;
    } else {
      panel.style.maxHeight = panel.scrollHeight + "px";
    } 
  });
}
</script>

</body>
</html>


You can browse this live example and try and play with this on W3School.com. Click here to open the example.