ExecutionException The forked VM terminated without properly saying goodbye. VM crash or System.exit called?
Showing posts with label Troubleshooting. Show all posts
Showing posts with label Troubleshooting. Show all posts
AEM Upgrade to AEM 6.5
Adobe documentation captures all the scenarios for the AEM upgrade[1]. On a high level, the changes are:
- There are two ways to upgrading the AEM instance, one is in-place upgrade and other is fresh install approach based on AEM content size.
- Upgrade artifacts by compiling against 6.5 uber jar.
- Test and fix any issues due to deprecated features/overlaid capabilities change.
- From 6.4, as part of the sustainable upgrades process, there is a repository restructuring that can be done (not mandatory)[2].
- Process on how to roll out the changes to production.
 |
| AEM Upgrade flowchat | Credit - Adobe ExperienceLeague |
If this is hard, adobe offers a backward compatibility mode from 6.3 with which one can run a 6.3 AEM artifact on a 6.5 instance[3].
Pattern detector is a mechanism provided by Adobe to easy identification of possible problems that will come up during upgrade by validating against deprecated features and overlays[4].
AEM 6.5 is compatible with Java 8[5].
2 https://docs.adobe.com/content/help/en/experience-manager-65/deploying/restructuring/repository-restructuring.html
3 https://docs.adobe.com/content/help/en/experience-manager-65/deploying/upgrading/backward-compatibility.html
4 https://docs.adobe.com/content/help/en/experience-manager-65/deploying/upgrading/pattern-detector.html
5 https://docs.adobe.com/content/help/en/experience-manager-65/deploying/introduction/technical-requirements.html
Pattern detector is a mechanism provided by Adobe to easy identification of possible problems that will come up during upgrade by validating against deprecated features and overlays[4].
AEM 6.5 is compatible with Java 8[5].
References
1 https://docs.adobe.com/content/help/en/experience-manager-65/deploying/upgrading/upgrade.html2 https://docs.adobe.com/content/help/en/experience-manager-65/deploying/restructuring/repository-restructuring.html
3 https://docs.adobe.com/content/help/en/experience-manager-65/deploying/upgrading/backward-compatibility.html
4 https://docs.adobe.com/content/help/en/experience-manager-65/deploying/upgrading/pattern-detector.html
5 https://docs.adobe.com/content/help/en/experience-manager-65/deploying/introduction/technical-requirements.html
How to configure server to listen TCP/IP port on Microsoft SQL Server?
In this article we will look how to configure or enable SQL Server database engine to listen to a particular port.
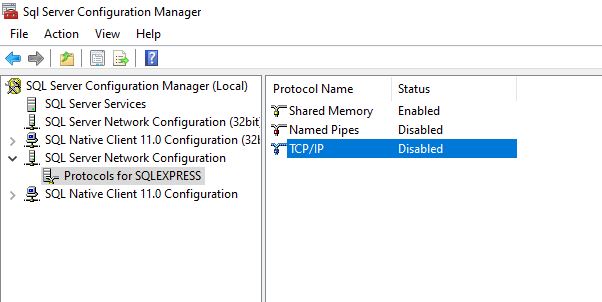
1. Open MS sql server configuration manager
Goto SQL server Network Configuration section >> Open protocol for SQLSERVER
You will see Protocol TCP/IP is showing in Disabled status. By default it is disabled.
 |
| SQL Server Configuration Manager |
2. Enable the TCP IP port
Default it will be Disabled, we have to enable it to listen a server request.
a. Double click on the TCP/IP option, a new window will appear.
b. From Protocol tab Select the Enabled value as Yes.
 |
| Enable TCP/IP in SQL Server |
3. Open the IP Address tab now. Here you will find few IP<n>, and you need to enable the right one and configure with write port.
Here, we will enable our localhost server request on port number 1433. 1433 is default port for MS sql server, which you may change as your wish. Configure the following values here.
Active = Yes
Enabled = YesIP Address = 127.0.0.0TCP Dynamic Ports = <keep it empty>. Default you may find 0 here, please remove the value 0.TCP Port = 1433
After making all these changes hit on apply button.
 |
| Configure TCP IP properties in MS SQL SERVER |
4. If you not sure about the request server and your application is unable to listen to configured IPn, then please update the IPAll section at the end of this IPs with same port number 1433.
 |
| IPALL MS SQL Server Configuration TCP/IP |
Note: These changes will not work until and unless we restart the SQL services. To restart the services. Again go to MS SQL server configuration manager.
Open SQL Server Configuration Manger >> click on SQL Server Service >> SQL Server (SERVER NAME) >> Right click on that and select the restart option.

No Java virtual machine was found
Error: A Java runtime environment (JRE) or Java Development Kit (JDK) must be available in order to run Eclipse. No Java virtual machine was found after searching the following locations: C:\Program Files\Java\jre1.8.0_221\bin

Cause of error: when we update the Java version, or install a new version of Java in machine.
Solution: We need to manually update path of current JRE or JDK path in Eclipse setting file.
Below is the sample of eclipse.ini file. You may open this file using notepad and notepad++.
In eclipse.ini file please update the correct JRE or JDK path at line number 13 under the -vm (virtual machine) and then save the file.
This will fix your issue and you will be now able to open the eclipse IDE without any issue.
e.g. path of a JDK version 1.8 : C:\Program Files\Java\jdk1.8.0_221\bin

Cause of error: when we update the Java version, or install a new version of Java in machine.
Solution: We need to manually update path of current JRE or JDK path in Eclipse setting file.
Where I can find the Eclipse setting file?
Directory: C:\Users\rashidjorvee\eclipse\jee-2019-06\eclipse\eclipse.iniBelow is the sample of eclipse.ini file. You may open this file using notepad and notepad++.
1 2 3 4 5 6 7 8 9 10 11 12 13 14 15 16 17 18 19 20 21 22 23 24 25 26 27 | -startup plugins/org.eclipse.equinox.launcher_1.5.400.v20190515-0925.jar --launcher.library C:\Users\username\.p2\pool\plugins\org.eclipse.equinox.launcher.win32.win32.x86_64_1.1.1000.v2019882098-2010 -product org.eclipse.epp.package.jee.product -showsplash org.eclipse.epp.package.common --launcher.defaultAction openFile --launcher.appendVmargs -vm C:/Program Files/Java/jre1.8.0_221/bin -vmargs -Dosgi.requiredJavaVersion=1.8 -Dosgi.instance.area.default=@user.home/eclipse-workspace -XX:+UseG1GC -XX:+UseStringDeduplication --add-modules=ALL-SYSTEM -Dosgi.requiredJavaVersion=1.8 -Dosgi.dataAreaRequiresExplicitInit=true -Xms256m -Xmx1024m --add-modules=ALL-SYSTEM -Declipse.p2.max.threads=10 -Doomph.update.url=http://download.eclipse.org/oomph/updates/milestone/latest -Doomph.redirection.index.redirection=index:/->http://git.eclipse.org/c/oomph/org.eclipse.oomph.git/plain/setups/ |
In eclipse.ini file please update the correct JRE or JDK path at line number 13 under the -vm (virtual machine) and then save the file.
This will fix your issue and you will be now able to open the eclipse IDE without any issue.
Where to find the installed JDK and JRE in machine?
In windows inside the profile files >> Java, you will find the installed JRE and JDK.e.g. path of a JDK version 1.8 : C:\Program Files\Java\jdk1.8.0_221\bin
How to uninstall an application from Microsoft store in Windows 10
This tutorial is for those users who are using Microsoft store and directly installing application from store in their Windows machine.
When you open the installed section of Microsoft store, where you could find all the installed applications and software in your Microsoft store. But here you will not find the option to uninstall an application.
Now you have an app installed, which you are not using from long back or no more beneficial for you, hence decided to uninstall from your machine. Then from where you will uninstall that application, so it may free your system memory and clean your Microsoft store?
In this article we will let you know how to remove or uninstall an application from windows 10. Below are steps which you need to follow to uninstall an application from Microsoft store in windows 10.
Step 1: Open Microsoft store from your Windows machine and click on the installed tab to check what all applications are installed in your machine. below is the screenshot.
 |
| Microsoft store installed tab |
Step 2: Press start/window button and search for settings
 |
| Search settings |
Step 3: Open settings, when you will click on the settings it will open a new window like below. From this setting dashboard click on the Apps as highlighted.
 |
| settings dashboard |
Step 4: This Apps will open a new screen to you. Below is the screenshot. On this screen, from search box search the application which you want to uninstall.
 |
| Apps and feature screen in windows 10 |
Step 5: When you find the application which you want to remove, then click on the application and click on the uninstall button.
 |
| uninstall an application from windows 10 |
You have successfully uninstalled application from your machine.
Subscribe to:
Posts (Atom)