Our senses do not tell us much about ultimate reality. For Plato, mathematics is the paradigm of knowledge, since it is done through intellectual reasoning independent of the apparent world around us, and tells us eternal unchanging truths. In The Republic Plato says that the soul has three parts, corresponding to reason, emotion, and desire. He also thinks that the soul (or at least part of it) is immortal, and can be reincarnated. Plato thinks that only those who understand the nature of goodness are fit to rule in society. Most people do not understand goodness. The rulers should try to maximize the happiness of society, by imposing strict censorship of ideas and of artistic expression. He saw no connection between happiness and individual liberty. He wants to show that there is absolute truth, and absolute right and wrong, and that human beings are not the measure of all things.
Plato | A Greek Philosopher
Plato is the well-known Greek Philosopher and student of Socrates. Socrates considered that unexamined life is not worth living and argues that virtue is knowledge. Plato has influenced by Socrates in pursuit of knowledge against sophists. He influenced the western philosophy than any philosopher. Plato’s interests were broad, including the study of knowledge, mathematics, ultimate reality, ethics, and politics. He thought that ultimate reality of things was given by their ‘forms.’ For Plato, the real world is unchanging, eternal, and beyond our senses. We can understand reality though intellectual study. The aim of philosophy is to get away from the world of sense and desire to the higher realm of existence of the Forms. The form of an object is its essence, and is what makes it what it is. Examples of forms include beauty, justice, numbers, and shapes. We can know about ultimate reality (the world of forms) through the use of our intellect.
Our senses do not tell us much about ultimate reality. For Plato, mathematics is the paradigm of knowledge, since it is done through intellectual reasoning independent of the apparent world around us, and tells us eternal unchanging truths. In The Republic Plato says that the soul has three parts, corresponding to reason, emotion, and desire. He also thinks that the soul (or at least part of it) is immortal, and can be reincarnated. Plato thinks that only those who understand the nature of goodness are fit to rule in society. Most people do not understand goodness. The rulers should try to maximize the happiness of society, by imposing strict censorship of ideas and of artistic expression. He saw no connection between happiness and individual liberty. He wants to show that there is absolute truth, and absolute right and wrong, and that human beings are not the measure of all things.
Our senses do not tell us much about ultimate reality. For Plato, mathematics is the paradigm of knowledge, since it is done through intellectual reasoning independent of the apparent world around us, and tells us eternal unchanging truths. In The Republic Plato says that the soul has three parts, corresponding to reason, emotion, and desire. He also thinks that the soul (or at least part of it) is immortal, and can be reincarnated. Plato thinks that only those who understand the nature of goodness are fit to rule in society. Most people do not understand goodness. The rulers should try to maximize the happiness of society, by imposing strict censorship of ideas and of artistic expression. He saw no connection between happiness and individual liberty. He wants to show that there is absolute truth, and absolute right and wrong, and that human beings are not the measure of all things.
Check and replace the attribute value using JS
We can use JQuery to find the element and then we can replace the attribute value of an HTML element. Below is a JS code snippet to find and replace an attribute value.
$this.next().attr('aria-expanded', function(index, attr){
return attr == 'false' ? 'true' : 'false';
});
Login into WinSCP using ssh key
Please follow the below steps to configure your WinSCP session using ssh(Secure Shell) key.
Create a new session in WinSCP. Select File Protocol and put Host name(IP address) and your ssh User name. Don't put anything in the Password field. Below is a screenshot for reference.
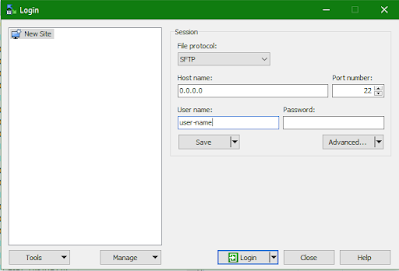

In the Private key file area, click on the browse option and select your .ppk (private key) file. WinSCP accepts only ssh keys generated via Putty but if you generated your key using OpenSSH don't worry WinScp will automatically convert your file in the required format after showing you a warning message.
For more, you could refer following documents
1. https://winscp.net/eng/docs/guide_public_key#winscp
2. https://docs.oracle.com/cd/E19509-01/820-3503/ggbgc/index.html
Bundle is NOT whitelisted in AEM
While using the loginAdministrative() method of SlingRepository class you might see an error "Bundle is not whitelisted". To get this method work we have to whitelist the bundle in OSGi configuration "Apache Sling Login Admin Whitelist" this helps us to defines which bundles can use SlingRepository.loginAdministrative().
Below is the code snippet of creating session using loginAdministartive method.
@Reference
private SlingRepository repository

Session session = repository.loginAdministrative(null);
How to get list of components in AEM?
We can get the list of components based on the project path or component group in AEM. SQL Query is powerful to filter out the component nodes and this can be easily used in the query tool of crx/de and export the results in a spreadsheet.
Below is the JCR-SQL2 query to get the list of all the components in AEM.
SELECT * FROM [cq:Component] AS s WHERE [componentGroup] IS NOT NULL AND ISDESCENDANTNODE([/apps/aem-sample-project/components])
 |
| AEM Query Tool |
Failed to read artifact descriptor | Maven
Problem
Failed to read artifact descriptor for com.adobe.acs:acs-aem-commons-bundle:jar:3.17.2: could not find artifact com.adobe.acs:acs-aem-commons:pom:3.17.2 in central (https://repo.maven.apache.org/maven2)
Resolution
In case you are seeing this error while building the code using Maven then please try to run the maven command with -Padobe-public or setting ssl=true. Below are the sample command lines.
mvn -PautoInstallPackage -Padobe-public clean install
OR
mvn clean install -P autoInstallPackage -Dmaven.wagon.http.ssl.insecure=true -Dmaven.wagon.http.ssl.allowall=true
Hide and show AEM component using authoring
Hi Friends, today in this article we are going to see an example of how we can hide and show the content of the AEM component using authoring.
First of all, we will add an isHide checkbox field in the component dialog so that an author can set it based on the requirement. Below is the code node structure of isHide node in the component dialog.
{
	jcr:primaryType: "nt:unstructured",
	uncheckedValue: "false",
	name: "./ishide",
	text: "Hide content",
	value: "true",
	sling:resourceType: "granite/ui/components/coral/foundation/form/checkbox",
	fieldDescription: "Hide the content of this component on page."
}
Since we have completed the dialog part now move to the component HTL page where we will manage the rendition.
<sly data-sly-use.objectJorvee="com.jorvee.aem.models.sample.custom.HideShow"></sly>
<sly data-sly-test="${!objectJorvee.isHide}">
	<div>rashidjorvee</div>
	<p>Some content here</p>
</sly
Once you will check the isHide option then after it will be difficult to find the component on the page, hence add the below line of code in the HTL file so that it will show a copy text to configure the component always in edit mode.
<div data-sly-test="${(wcmmode.edit)}"
     style="text-align: center; padding: 20px 0; width: 100%; text-decoration: underline; color: #00a8e1;"
     data-sly-unwrap="${wcmmode.disabled}">Configure your AEM component
</div>
JSP Implicit Objects
Implicit Objects in JSP
The JSP expression language defines a set of implicit objects, that are available with all JSP pages. Below are some JSP implicit objects and their description:
ScopedAttributeELResolver evaluates a single object that is stored in scope. Like ImplicitObjectELResolver, it also only evaluates expressions with a base of null. This resolver essentially looks for an object in all of the scopes until it finds it, according to the behavior of PageContext.findAttribute(String). For example, when evaluating the expression ${product}, the resolver will look for product in the page, request, session, and application scopes and will return its value. If product is not found, null is returned.
When an expression references one of the implicit objects by name, the appropriate object is returned instead of the corresponding attribute. For example, ${pageContext} returns the PageContext object, even if there is an existing pageContext attribute containing some other value.
The JSP expression language defines a set of implicit objects, that are available with all JSP pages. Below are some JSP implicit objects and their description:
- pageContext: The context for the JSP page. Provides access to various objects including:
- servletContext: The context for the JSP page’s servlet and any web components contained in the same application. See Accessing the Web Context.
- session: The session object for the client. See Maintaining Client State.
- request: The request triggering the execution of the JSP page. See Getting Information from Requests.
- response: The response returned by the JSP page. See Constructing Responses.
In addition, several implicit objects are available that allow easy access to the following objects:
Finally, there are objects that allow access to the various scoped variables described in Using Scope Objects.
JSP 2.1 provides two EL resolvers to handle expressions that reference these objects: ImplicitObjectELResolver and ScopedAttributeELResolver.
A variable that matches one of the implicit objects is evaluated by ImplicitObjectResolver, which returns the implicit object. This resolver only handles expressions with a base of null. What this means for the following expression is that the ImplicitObjectResolver resolves the sessionScope implicit object only. Once the implicit object is found, the MapELResolver instance resolves the profile attribute because the profile object represents a map.
- param: Maps a request parameter name to a single value
- paramValues: Maps a request parameter name to an array of values
- header: Maps a request header name to a single value
- headerValues: Maps a request header name to an array of values
- cookie:Maps a cookie name to a single cookie
- initParam: Maps a context initialization parameter name to a single value
Finally, there are objects that allow access to the various scoped variables described in Using Scope Objects.
- pageScope: Maps page-scoped variable names to their values
- requestScope: Maps request-scoped variable names to their values
- sessionScope: Maps session-scoped variable names to their values
- applicationScope: Maps application-scoped variable names to their values
JSP 2.1 provides two EL resolvers to handle expressions that reference these objects: ImplicitObjectELResolver and ScopedAttributeELResolver.
A variable that matches one of the implicit objects is evaluated by ImplicitObjectResolver, which returns the implicit object. This resolver only handles expressions with a base of null. What this means for the following expression is that the ImplicitObjectResolver resolves the sessionScope implicit object only. Once the implicit object is found, the MapELResolver instance resolves the profile attribute because the profile object represents a map.
${sessionScope.profile}
ScopedAttributeELResolver evaluates a single object that is stored in scope. Like ImplicitObjectELResolver, it also only evaluates expressions with a base of null. This resolver essentially looks for an object in all of the scopes until it finds it, according to the behavior of PageContext.findAttribute(String). For example, when evaluating the expression ${product}, the resolver will look for product in the page, request, session, and application scopes and will return its value. If product is not found, null is returned.
When an expression references one of the implicit objects by name, the appropriate object is returned instead of the corresponding attribute. For example, ${pageContext} returns the PageContext object, even if there is an existing pageContext attribute containing some other value.
Reference
What is ARIA attribute?
Accessible Rich Internet Applications (ARIA) is a set of attributes that define ways to make web content and web applications (especially those developed with JavaScript) more accessible to people with disabilities.
It supplements HTML so that interactions and widgets commonly used in applications can be passed to assistive technologies when there is not otherwise a mechanism. For example, ARIA enables accessible navigation landmarks in HTML4, JavaScript widgets, form hints and error messages, live content updates, and more. ARIA was invented after HTML4, so does not validate in HTML4 or its XHTML variants.
aria-label: aria-label is used to add a label with any input field or CTA that will be identified by screen reader devices. This is helpful when we have any such form field that doesn't have a label and we are using a placeholder to describe the field. e.g. aria-label="Submit the application form"
Hope this ARIA article helps you to apply accessibility to your website and makes your site or portal accessible for all users.
It supplements HTML so that interactions and widgets commonly used in applications can be passed to assistive technologies when there is not otherwise a mechanism. For example, ARIA enables accessible navigation landmarks in HTML4, JavaScript widgets, form hints and error messages, live content updates, and more. ARIA was invented after HTML4, so does not validate in HTML4 or its XHTML variants.
What ARIA attributes to use on HTML elements?
aria-label: aria-label is used to add a label with any input field or CTA that will be identified by screen reader devices. This is helpful when we have any such form field that doesn't have a label and we are using a placeholder to describe the field. e.g. aria-label="Submit the application form"
aria-describedby
aria-required
aria-invalid
aria-hidden
aria-expended: aria-expended attribute is used with accordion where we set expended value true or false. When an accordion is open to read then set aria-expended="true" attribute otherwise aria-expended="false".
Hope this ARIA article helps you to apply accessibility to your website and makes your site or portal accessible for all users.
ARIA References
How to start AEM with Dynamic Media
Dynamic media work as a run-mode in AEM and default it is disabled in AEM. When we start AEM using command we need to add "-r dynamicmedia_scene7" in the command line to start the AEM with dynamic media.
We could also set this run-mode in start file along with other run-modes separated by comma(,).
set CQ_RUNMODE=author,dynamicmedia_scene7
References
Can we change the production release time set in cloud manager?
Yes, we can change the production release or scheduled release time in the cloud manager pipeline. At the step of schedule production deployment, we will see the option to Change the schedule, from there we can reschedule the deployment time.
 |
| Schedule Production Deployment Step in Adobe Cloud Manager |
Note: we will try to change or schedule the production release within 2 hours then this option will not allow you to do so and an error message populates "Please make sure the selected date and time is between 2 and 72 hours in the future". In that case, use the Schedule production deployment release now option and proceed with deployment.
Java SDK 11 required to run AEM as Cloud Service
We need Java 11 SDK to work on AEM as CS. If you try to run on a lower version of Java SDK then it will throw an error. below is the error which you will get when you try to run the AEM as a cloud service jar using Java 1.8
E:\aem-sdk>java -jar aem-sdk-quickstart-author-p4502.jarLoading quickstart properties: default
Loading quickstart properties: instance
java.lang.Exception: Quickstart requires a Java Specification 11 VM, but your VM (Java HotSpot(TM) 64-Bit Server VM / Oracle Corporation) reports java.specification.version=1.8
at com.adobe.granite.quickstart.base.impl.Main.checkEnvironment(Main.java:1046)
at com.adobe.granite.quickstart.base.impl.Main.<init>(Main.java:646)
at com.adobe.granite.quickstart.base.impl.Main.main(Main.java:981)
Quickstart: aborting

Manage multiple git accounts in a machine
While working with multiple Bitbucket or GitLab accounts in a single machine but have a different user name and email, then we can set the local users for a specific repository using the below git commands. By default, Git picks the global user and email that is created in the .gitconfig file. This will help you to check-in the code with the correct user name and email.
Go to the directory path where you cloned the repo and open the GitBash. Run below commands one by one.
git config user.name "Git User1"
git config user.email git-account1@gitaccount.com
After executing the above git config user.name and git config user.email commands, you have done with local user setup for that git repogetory. Now commit a change and using git commit and verify the user name and email with the commit.
Hope this helps you to manage your multiple git accounts.
This failure was cached in the local repository and resolution is not reattempted until the update interval of central has elapsed or updates are forced
When we build a maven project, we might encounter a very common Maven cached error, due to that our build is getting failed. This is caused by Maven’s default update policy. With respect to fixing this error, er have to run the "mvn install" command in forcefully update mode.
To bypass this default restriction, you can do the following:
To bypass this default restriction, you can do the following:
- add the -U flag to the maven install command, or
- configure your Maven clients’ settings.xml file with the following value <updatePolicy>always</updatePolicy>. Below is the sample settings.xml file.
<settings xmlns="https://maven.apache.org/SETTINGS/1.0.0"
  xmlns:xsi="https://www.w3.org/2001/XMLSchema-instance"
  xsi:schemaLocation="https://maven.apache.org/SETTINGS/1.0.0
                      https://maven.apache.org/xsd/settings-1.0.0.xsd">
<profiles>
 <!-- ====================================================== -->
 <!-- A D O B E   P U B L I C   P R O F I L E                -->
 <!-- ====================================================== -->
     <profile>
         <id>adobe-public</id>
         <activation>
             <activeByDefault>true</activeByDefault>
         </activation>
         <properties>
             <releaseRepository-Id>adobe-public-releases</releaseRepository-Id>
             <releaseRepository-Name>Adobe Public Releases</releaseRepository-Name>
             <releaseRepository-URL>https://repo.adobe.com/nexus/content/groups/public</releaseRepository-URL>
         </properties>
         <repositories>
             <repository>
                 <id>adobe-public-releases</id>
                 <name>Adobe Public Repository</name>
                 <url>https://repo.adobe.com/nexus/content/groups/public</url>
                 <releases>
                     <enabled>true</enabled>
                     <updatePolicy>never</updatePolicy>
                 </releases>
                 <snapshots>
                     <enabled>false</enabled>
                 </snapshots>
             </repository>
         </repositories>
         <pluginRepositories>
             <pluginRepository>
                 <id>adobe-public-releases</id>
                 <name>Adobe Public Repository</name>
                 <url>https://repo.adobe.com/nexus/content/groups/public</url>
                 <releases>
                     <enabled>true</enabled>
                     <updatePolicy>always</updatePolicy>
                 </releases>
                 <snapshots>
                     <enabled>false</enabled>
                 </snapshots>
             </pluginRepository>
         </pluginRepositories>
     </profile>
</profiles>
 <activeProfiles>
     <activeProfile>adobe-public</activeProfile>
 </activeProfiles>
</settings>
View the contrast ratio of a text element with Color Picker in Chrome developer tool
The contrast ratio is a color property of a display system, that defined as the ratio of the luminance of the brightest shade to that of the darkest shade that the system is capable of producing. In the web world example, a text is written on top of any background(background could be either color or an image).
The contrast ratio is very important for accessibility. Some people with low vision do not see areas as very bright or very dark. Everything tends to appear at about the same brightness, which makes it hard to distinguish outlines and edges. The Contrast ratio measures the difference in brightness between the foreground and background of the text. If a text has a low contrast ratio, then these low vision users may literally experience the site as a blank screen, and can not read the text that is written on web page.
Chrome Color Picker
Google Chrome developer tool is very helpful to investigate and fix the contrast ratio on a web page using the color picker option of style. The Color Picker can help you make sure that the text meets recommended contrast ratio levels:1. Open the developer tool in the Chrome browser. (using option right click on page > inspect or pressing F12 button)
2. Click the Elements tab in developer tool.
3. In the DOM Tree, select the text element that you want to inspect.
4. In the Styles pane, click the color square next to the element's color value.

5. Check the Contrast Ratio section of the Color Picker. One checkmark means that the element meets the minimum recommendation. Two checkmarks mean that it meets the enhanced recommendation.

6. Click the Contrast Ratio section to see more information. A line appears in the visual picker at the top of the Color Picker. If the current color meets recommendations, then anything on the same side of the line also meets recommendations. If the current color does not meet recommendations, then anything on the same side also does not meet recommendations.
This is how we fix the contrast ratio issue for low vision people and make a web page accessible for all human beings. Hope this helps you to debug the accessibility issue related to the contrast ratio. please feel free to let us know your experience and if you know any other way to debug and fix the contrast ratio on a web page. Thank you!

References:
What is the difference between first and second dose of COVID19 vaccine ?
There is no difference in the first and second dose, a person has to just ensure while taking the second dose that the manufacturer and vaccine are the same as he/she taken in the first dose.

Side effect of Covid19 vaccine
There are few temporary side effects of Covid19 vaccines. Below are the reported reactions to the Covid19 vaccines:
- Injection site discomfort, such as pain, swelling, redness, or bruising
- Muscle pain
- Joint pain
- Headache
- Fatigue
- Chills
- Fever
- Lymph node swelling
If you experience any such side effects, please dont take any medicine and contact nearby hospital for prescription.
References
National Institute of Foundry and Forge Technology at Ranchi
National Institute of Foundry and Forge Technology at Ranchi was set up in collaboration with UNDP-UNESCO (United Nation Development Program-United Nation Economic Social and Cultural Organisation). Both organizations UNDP and UNESCO are a body of the United Nations.
Established
The government of India established NIFFT at Ranchi in the year 1996 in collaboration with UNDP.
Collaboration
National Institute of Foundry and Forge Technology was set up in collaboration with UNDP-UNESCO.
Department
NIFFT has currently five departments.
- Department of Applied Science and Humanities,
- Foundry Technology,
- Forge Technology,
- Manufacturing Engineering and
- Materials and Metallurgical Engineering
Which party raised slogan "Jharkhand Abua daku Diko Senoa"?
Jharkhand Party raised the slogan "Jharkhand Abua daku Diko Senoa" which means "Jharkhand is ours, the dacoit Diko shall have to quit" during general election 1952. In the 1952 general election, Jharkhand party emerged as the second largest party in the Bihar assembly.
Resolve code merge conflicts
In this blog post, we are going to learn to resolve the conflicts with merge requests or pull requests in Git codebase.
Let's assume we have two branches and trying to merging code from develop branch to master branch. Git merge conflicts | Atlassian
Source branch: develop
Destination branch: master
Step1: Open Git bash and check out the latest source branch code in local directory. e.g. git checkout develop This Git command will pull the latest code from develop branch in the local repo and this will change the current working branch to develop in Git Bash.
Step2: Now we need to pull the code of the destination branch into the source branch. Hence in our case, we will run Git command git pull origin master. This command will pull the code from the destination and match it with the source. This will also show you a list of all the files where conflict needs to be resolve to successfully merge.
Example:
Auto-merging src/header.java
CONFLICT (content): Merge conflict in src/header.java
Automatic merge failed; fix conflicts and then commit the result.
Step3: Now open your developer IDE and look for above mentioned file [src/header.java], and see where the conflict is. IDE by default also gives some hint to accept the source changes or destination changes, you may just click on that option and keep and go only with one change. If you think that option is not sufficed your need and you have to manually make some changes in code then go ahead and make the required changes and save the changes.
Step4: Since we have fixed the code changes, now it is time to check-in the code into the source branch. To check-in the code uses the below commands in Git one by one.
git add <file name> or .(dot) if we wants to add all the files.
git commit -m "commit message"
git push origin develop
Step5: Now go to merge request and see, the conflicts will be get resolved. And now we could merge the code.
Reference:
Setup DynamoDB in local machine and use as SQL
DynamoDB is a NoSQL database provided by Amazon. Those who are working on Dynamo DB always have to connect and work on dynamo DB using the web browser. But now Amazon came with NoSQL workbench that is an application which helps developers to connect with dynamo DB instance hosted on Amazon or local dynamo DB installed in local machine. Let's see how a NoSQL workbenchhelps developer and how a developer can connect and use NoSQL Workbench.
Prerequisite
You should have the latest Docker installed in your local machine.
Install and Setup DynamoDB
1. Run the docker.
2. Download the latest DynamoDB Docker image.
2.1 Open a command prompt and run this command to download the docker image file for dynamo DB.The command needs to run docker pull amazon/dynamodb-local
Download dynamo DB docker image

2.2 To start the docker run the following command docker run -d 8000:8000 amazon/dynamodb-local

2.3 Check the status of docker using command >> docker ps
3. Download the NoSQL workbench tool from Amazon site.
4. Open the NoSQL workbench, go to operation builder and click on "Add connection" to create a new database connection.
 |
| NoSQL benchmark for Amazon DynamoDB |
5. Now NoSQL benchmark is connected with dynamoDB. You can now run your SQL command and perform transactions.
Hope this helps you! Thank You!
Error occurred during initialization of VM, could not reserve enough space for object heap
When we try to run any Java application that required more heap memory or we have explicitly set the heap memory -Xmx. e.g. to set heap memory to 512 MB of RAM(Random Access Memory) size use, -Xmx512M
Solution:
There could be multiple ways to fix this issue.
1. Restart the Virtual Machine or system.
2. Set environment variable JAVA_OPTS=-Xms256M. To read more on the environment variable read here.
Brick-Hued Hills: A Palette of Nature's Beauty
Nestled between the valleys and under the expansive sky, the brick-hued hills stand as a testament to the awe-inspiring artistry of nature. These unique geological formations, characterized by their warm and earthy tones, evoke a sense of tranquility and connection with the natural world. In this article, we explore the captivating allure of brick-hued hills and their significance in the tapestry of landscapes.
A Painter's Canvas
The brick-hued hills derive their distinctive color from a harmonious blend of minerals, sediments, and geological processes that have unfolded over millennia. The earthy red and brown tones result from the presence of iron oxides and other minerals that have weathered and oxidized over time. As the sun's rays caress these hills, their hues shift and transform, creating a breathtaking spectacle that seems almost otherworldly.
Nature's Sculptors
Geological forces have played a vital role in shaping these brick-hued hills into their current form. Erosion, uplift, and tectonic activity have sculpted the land, revealing layers of sedimentary rock and geological history. These hills often emerge as a result of intricate geological processes, including sediment deposition, compression, and weathering.
Cultural and Ecological Significance
Brick-hued hills hold cultural and ecological significance in various regions around the world. They often serve as iconic landmarks, symbols of resilience, and sources of inspiration for local communities. In some cultures, these hills are associated with ancient legends and myths, enriching the tapestry of human storytelling.
Moreover, these unique landscapes often support diverse ecosystems, housing a variety of flora and fauna adapted to their distinct geology and climatic conditions. The undulating contours of brick-hued hills provide habitats for plant species that thrive in arid or semi-arid environments. The interplay between the terrain, soil composition, and sunlight creates microhabitats that sustain life in harmony with the land.
Visions of Tranquility
The allure of brick-hued hills extends beyond their visual splendor. They offer a sanctuary for those seeking solace and contemplation. The tranquility of these landscapes invites travelers and explorers to immerse themselves in the raw beauty of the earth, allowing them to connect with nature on a profound level.
Preserving Natural Treasures
As we marvel at the captivating beauty of brick-hued hills, it is imperative to recognize the importance of environmental stewardship. These unique landscapes are fragile and vulnerable to human activities and climate change. Conservation efforts are crucial to ensure that future generations can continue to be enchanted by the timeless allure of these natural wonders.
The brick-hued hills stand as a testament to the remarkable artistry of nature, showcasing the harmonious interplay between geology, minerals, and time. Their warm and earthy tones invite us to pause and reflect on the intricate beauty that surrounds us. As we traverse the landscapes of brick-hued hills, we are reminded of the boundless wonders that the natural world has to offer.
Unused assignments should be removed | Sonar
Sonar code smell "Unused assignments should be removed" means,
a dead store happens when a local variable is assigned a value that is not read by any subsequent instruction. Calculating or retrieving a value only to then overwrite it or throw it away, could indicate a serious error in the code. Even if it’s not an error, it is at best a waste of resources. Therefore all calculated values should be used.Noncompliant Code
i = a + b; // Noncompliant; calculation result not used before value is overwritteni = compute();
Compliant Solution
i = a + b;i += compute();
SQL query to update DynamoDB records
In this post, we will look at how to alter or update records in the No-SQL DynamoDB table. The SQL language provides the UPDATE statement for modifying data. Amazon DynamoDB uses the UpdateItem operation to accomplish similar tasks.
Syntax to run the update command
UPDATE <"TableName">
SET <column name> = <value>
WHERE <column name> = <value>
e.g.
UPDATE "user"
SET enabled='true'
WHERE id='dynamoDBUser'
Here SET clause is to set the value which you want to set, and WHERE clause is to identify the right row or data from the table.
Reference:
Can we have multiple doGet() or doPost() in a servlet?
No, it doesn't make sense to creating multiple doGet() or doPost() methods in a Servlet. The compiler will always execute the first one. It's better to write a different Servlet to handle the different requests.
One other way is the method overriding, we can override doGet() or doPost() in any of the methods viceversa. For more read Overriding Service, Get, and Post
Mangrove Tree
Mangrove trees are a group of salt-tolerant woody plants that thrive in coastal and estuarine environments. They possess unique adaptations, such as aerial roots and salt-filtering mechanisms, allowing them to survive in brackish waters and waterlogged soils. Mangroves play a vital role in the ecosystem by preventing coastal erosion, providing habitats for diverse marine life, sequestering carbon dioxide, and supporting coastal communities through fisheries and livelihood opportunities. Their conservation is crucial for the well-being of coastal ecosystems and the environment at large.
Types of Mangrove Trees in Different Regions
- Red Mangrove (Rhizophora spp.): Found in tropical and subtropical regions, red mangroves have distinctive prop roots that arch above the water, providing stability in muddy environments. They are prevalent in the Atlantic and Indo-Pacific regions.
- Black Mangrove (Avicennia spp.): Common in subtropical and tropical regions, black mangroves have pneumatophores, or aerial roots, which help them respire in waterlogged soils. They are found in the Americas, Africa, Asia, and Australia.
- White Mangrove (Laguncularia racemosa): White mangroves occur in the Americas, the Atlantic coast of Africa, and the Indo-Pacific region. They have salt-excreting glands on their leaves, enabling them to tolerate high salinity levels.
- Grey Mangrove (Avicennia marina): Grey mangroves are widespread in tropical and subtropical regions, including the coasts of Australia, Asia, Africa, and the Middle East. They have a dense network of pneumatophores to survive in waterlogged soils.
- Sonneratia spp.: These mangroves are found in the Indo-Pacific region and are characterized by their viviparous seeds that germinate on the parent tree before falling into the water to establish new colonies.
- Bruguiera spp.: Common in Southeast Asia and Oceania, Bruguiera mangroves have distinctive knee-like pneumatophores that emerge from the soil.
- Rhizophora mucronata: This species is native to South Asia and is known for its robust prop roots and salt-filtering capacity.
Each type of mangrove tree plays a unique role in its respective ecosystem, contributing to the overall health and sustainability of coastal environments around the world. Protecting and preserving mangrove habitats is crucial to ensuring the continued ecological benefits they provide and safeguarding the delicate balance of coastal ecosystems.
Features of Mangrove Trees
- Salt Tolerance: One of the most distinctive features of mangrove trees is their ability to thrive in saline and brackish water environments. They have specialized adaptations that allow them to filter out excess salt, enabling their survival in coastal areas and estuaries.
- Aerial Roots: Mangrove trees develop unique aerial roots known as pneumatophores, which protrude above the water level. These roots serve as a breathing mechanism, facilitating the exchange of gases in the oxygen-poor mud, where the trees grow.
- Propagules: Mangroves reproduce through propagules, which are seedlings that germinate while still attached to the parent tree. Once the propagules are mature, they drop into the water and are carried away by tides to establish new colonies in other areas.
- Tolerance to Waterlogged Soil: Mangrove trees have evolved to adapt to waterlogged soil conditions, which can be anaerobic and low in nutrients. Their roots are capable of filtering oxygen from the air to supply the underground parts, allowing them to thrive in waterlogged environments.
Importance of Mangrove Trees for the Environment
- Coastal Erosion Prevention: Mangrove forests act as natural barriers that protect coastlines from erosion, storm surges, and tidal waves. The dense network of roots stabilizes the soil, reducing the impact of strong waves and currents.
- Biodiversity and Habitat: Mangrove ecosystems provide a unique habitat for a diverse range of flora and fauna. They serve as nurseries for various marine species, including fish, crustaceans, and migratory birds, enhancing biodiversity in coastal areas.
- Carbon Sequestration: Mangrove trees are highly efficient at sequestering carbon dioxide from the atmosphere. They store significant amounts of carbon in their biomass and soil, making them crucial players in mitigating the effects of climate change.
- Water Quality Improvement: Mangroves act as natural water purifiers by filtering pollutants and excess nutrients from the water. They help maintain water quality and prevent pollution from reaching sensitive marine ecosystems.
- Soil Stabilization: The extensive root systems of mangrove trees prevent soil erosion and sediment deposition, helping maintain the health of estuarine and coastal ecosystems.
- Fisheries and Livelihoods: Mangroves support artisanal fisheries and provide livelihood opportunities for coastal communities. They serve as a source of food, medicine, and raw materials for local populations.
- Storm Protection: Mangrove forests serve as a buffer against storm surges and hurricanes, absorbing the impact of strong winds and reducing damage to coastal communities.
- Climate Change Resilience: The conservation and restoration of mangrove ecosystems contribute to climate change resilience, as they can act as natural buffers against the effects of rising sea levels and extreme weather events.
In conclusion, mangrove trees play a crucial role in coastal ecosystems, providing invaluable ecological services that benefit both the environment and local communities. Their unique adaptations and multifaceted contributions make them essential components of healthy and sustainable coastal environments worldwide. Protecting and preserving mangrove habitats is vital for safeguarding biodiversity, mitigating climate change, and ensuring the overall health of our planet's coastal regions.
working with enum in Java
enum Level {
  LOW("A"),
  MEDIUM("B"),
  HIGH("C");

  	public final String value;

  	Level(String val){
  		value=val;
  	}
	public String getValue() {
        return value;
    }
}

public class Main {
  public static void main(String[] args) {
    String myVar = Level.HIGH.getValue();
    System.out.println(myVar);
  }
}
 |
| Output |
Unchecked runtime.lastError: The message port closed before a response was received.
While working with any JS framework we may encounter the error Unchecked runtime.lastError: The message port closed before a response was received. on the console of Chrome browser but not on any other browser.
Cause of Issue:
This we may experience if we have an extension installed in the Chrome browser. That extension is triggering events and looking for some information from the web page.
Resolution:
Remove the extensions from the Chrome browser.
Reference
Adobe Analytics - Virtual report suites
Adobe Analytics virtual report suites segment our Adobe Analytics data so that we can control access to each segment. The virtual report suite inherits the data from the global report suite. For example, if we would like to manage the web and mobile Analytics data into a single report suite and all data are flowing into a global report suite, but to segregate those data further those data also flowing into smaller report suites. We set a variable to multiple report suites, and send their data to more than one report suite. This is referred to as multi suite tagging or base/parent report suites.
So, the purpose is to send the data to one report suite, which then is divided according to segments. And based on that segment we can control the access of Analytics data like what information should visible to a particular Analytics user.
So, the purpose is to send the data to one report suite, which then is divided according to segments. And based on that segment we can control the access of Analytics data like what information should visible to a particular Analytics user.
Benefits of using Virtual report suites
- Simplify implementation by allowing you to use a single Report Suite ID (RSID) across all sites/domains. Having all data in a single report suite enables customer analytics as we move toward the next generation of Adobe Analytics.
- Business users in your organization always see only the data segments that are relevant to them.
- Improve security by allowing Admin users to control data access more easily and more granularly after implementation.
- Provide the ability to participate in Device Co-op
- People metric
- A single-customer view of data (in the future)
- The ability to create unlimited virtual report suites to segment out data
Reference:
Uncaught SyntaxError: Unexpected token const
const may already be written in your code which is not terminated. Please terminate that first using a semicolon(;) and then declare a const again.
OR
Use the same first const and for the second constant declaration simply write the constant name and assign value without using the const keyword.
How dispatcher fulfill request?
When clients send HTTP requests to the web server, the URL of the requested page must be resolved to the content in the Dispatcher cache, and eventually to the content in the repository.

- The domain name system discovers the IP address of the web server which is registered for the domain name in the HTTP request.
- The HTTP request is sent to the web server.
- The HTTP request is passed to Dispatcher.
- Dispatcher determines whether the cached files are valid. If valid, the cached files are served to the client.
- If cached files are not valid, Dispatcher requests newly-rendered pages from the AEM publish instance.
References
Reading excel data in Java Sprint Boot
In this article, we will walk through the steps and program which we need to develop to read the excel data in Java program or spring boot application.
1. Maven dependency
There is an Apache POI library that we need to add to our project, that will help us to easily perform read and write with excel.
<!-- https://mvnrepository.com/artifact/org.apache.poi/poi -->
<dependency>
    <groupId>org.apache.poi</groupId>
    <artifactId>poi</artifactId>
    <version>4.1.2</version>
</dependency>
<dependency>
    <groupId>org.apache.poi</groupId>
    <artifactId>poi-ooxml</artifactId>
    <version>4.1.2</version>
</dependency>
2. Apache POI
A major use of the Apache POI api is for Text Extraction applications such as web spiders, index builders, and content management systems.The Apache POI Project's mission is to create and maintain Java APIs for manipulating various file formats based upon the Office Open XML standards (OOXML) and Microsoft's OLE 2 Compound Document format (OLE2). In short, you can read and write MS Excel files using Java. In addition, you can read and write MS Word and MS PowerPoint files using Java. Apache POI is your Java Excel solution (for Excel 97-2008). We have a complete API for porting other OOXML and OLE2 formats and welcome others to participate.
There are four types of API available in Apache POI, that we can use to extract the text from different types of files.
- POIFS: POIFS APIs are used if you had a document written in OLE 2 Compound Document Format, probably written using MFC, that you needed to read in Java.
- HSSF: HSSF APIs are used if you needed to read or write an Excel file using Java (XLS).
- XSSF: XSSF APIs are used if you need to read or write an OOXML Excel file using Java (XLSX).
- SXSSF: SXSSF APIs can be used for large excel files, that allows you to write very large Excel (XLSX) files in a memory optimized way.
The above summary has been written from Apache POI documentation. To read and explore more about POI you may visit the official Apache POI site. https://poi.apache.org/
3. Reading from an excel file
After importing the required dependency let's see a sample program that will help us to read the text from an excel sheet.
An excel sheet name "role_mapping_sheet.xlsx" having the following data. This excel sheet you need to keep in the project and it path we have to define in the program. Below is the snapshot of excel data.

Now, we need to create a model class that maps the value of these two columns into two class variables.
RoleTableModel.java
/**
 *
 */
package serialization;

/**
 * @author rashid
 *
 */
public class RoleTableModel {

	public RoleTableModel(String title) {
		super();
		this.title = title;
	}

	public RoleTableModel() {
	}

	private String title;

	public String getTitle() {
		return title;
	}

	public void setTitle(String title) {
		this.title = title;
	}

	@Override
	public String toString() {
		return "RoleTableModel [title=" + title + "]";
	}
}
Now, see the actual implementation class where we are performing the extraction. Below is the class InsertRoleData.java
import java.io.File;
import java.io.FileInputStream;
import java.io.IOException;
import java.io.InputStream;
import java.util.ArrayList;
import java.util.List;

import org.slf4j.Logger;
import org.slf4j.LoggerFactory;
import org.thymeleaf.util.ClassLoaderUtils;

import org.apache.poi.ss.usermodel.Cell;
import org.apache.poi.ss.usermodel.Row;
import org.apache.poi.ss.usermodel.Sheet;
import org.apache.poi.ss.usermodel.Workbook;
import org.apache.poi.xssf.usermodel.XSSFCell;
import org.apache.poi.xssf.usermodel.XSSFRow;
import org.apache.poi.xssf.usermodel.XSSFSheet;
import org.apache.poi.xssf.usermodel.XSSFWorkbook;

import serialization.RoleTableModel;


public class InsertRoleData {
	Workbook workbook;
	private static final Logger LOGGER = LoggerFactory.getLogger(InsertRoleData.class);
	public List<RoleTableModel> getExcelDataAsList() {

		List<String> list = new ArrayList<String>();
		int noOfColumns = 0;
		try {
			FileInputStream file = new FileInputStream(new File("src\\main\\resources\\static\\role_mapping_sheet.xlsx"));
			workbook = new XSSFWorkbook(file);
			Sheet sheet = workbook.getSheetAt(0);
			noOfColumns = sheet.getRow(0).getLastCellNum();

			for (Row row : sheet) {
				for (Cell cell : row) {
					String cellValue = cell.toString();
					list.add(cellValue);
				}
			}
		} catch (IOException e) {
			e.printStackTrace();
		}
		List<RoleTableModel> allRoles = createList(list, noOfColumns);
		LOGGER.info("Number of columns: "+noOfColumns);
		return allRoles;
	}

	private List<RoleTableModel> createList(List<String> excelData, int noOfColumns) {

		ArrayList<RoleTableModel> invList = new ArrayList<RoleTableModel>();

		int i = noOfColumns;
		do {
			RoleTableModel inv = new RoleTableModel();
			inv.setTitle(excelData.get(i));
			LOGGER.info("role model "+inv.toString());
			invList.add(inv);
			i = i + (noOfColumns);

		} while (i < excelData.size());
		LOGGER.info("role model list "+invList.toString());
		return invList;
	}

}
You may now simply run your spring boot or java application and read the text from excel sheet cell by cell. Hope this helps you in implementation. If you face any issue while implementation of Apache POI, feels free to ask your question in the comment section. Thank You!
Subscribe to:
Posts (Atom)