Menu

Configure and start remote debugger in Eclipse

Set the remote debugger configuration in Eclipse, to debug the running application code and identify the code issues.

Step 1: Open the Debug perspective from tool bar. if you don't see debug perspective option in your toolbar, then open the perspective from this path in Eclipse. 
Windows >> Perspective >> Open perspective >> Others >> Debug  
  1. Click on the perspective drop-down option very next to bug symbol.
  2. Select the option Debug configuration

Debug Configuration in Eclipse
Step 2: Debug Configuration will open a new window(below is the screenshot).
  1. Click on Remote Java Application option from left side rail.
  2. Click on the New Launch configuration(new configuration) button. As shown in the screenshot below.

Remote Java Application setup

Step 3: Once you click on new configuration button, a configuration setup option will appear right side on same window. Switch to connect tab, if you are not on the connect tab by default.
  1. In Name section, please provide a valid name.
  2. In Connection Properties section specify the host and port on which your application is running. 
    e.g. 
    Host: localhost
    Port: 30303 (default AEM debug mode port)
  3. Project: Select the core folder of your project.
  4. Connection type: Keep it as Standard.

Debugger remote connection setup

Step 4: Now switch to source tab, next to connect and configure your Java project. Below is the screenshot.

  1. Switch to source tab
  2. Click on Add option
  3. Select Java Project option
  4. Hit Ok button
  5. Select your project 
  6. Hit Ok button
  7. After successful selection your project get added in the source section.  
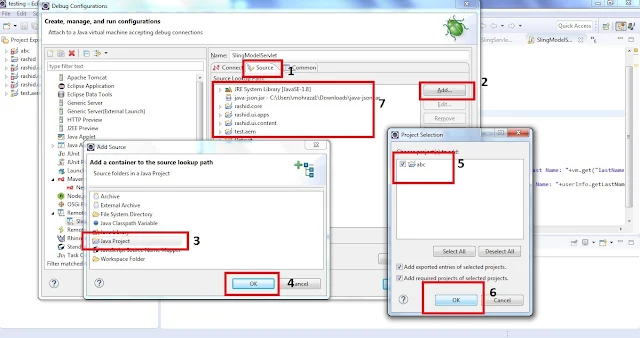
Debug project setup in Eclipse

You have successfully setup the debugger with your remote application. Now run or tune your application in debug mode and start the debugger in Eclipse from debug perspective to listen the request from your application server to Eclipse.

How to export the list of users from AEM?

To manage the user and security purpose, we always need the list of available and active users in our system for analysis. Adobe Experience Manager(AEM) also have an in build user management section to manage the AEM user and make the things secure. In this article we will export or generate the list of available user from AEM in an excel file. To perform this activity we will use the ACS commons. ACS commons provide so many powerful tools, which is easy to use and easily plug-able on AEM, by installing ACS commons package.

Prerequisite:

ACS commons should be installed in your AEM instance. If you don't have latest ACS commons installed in your AEM instance, then you can easily and free download the ACS package from here and install the package in your AEM instance using package manager.

Now we will perform the following steps to export the user list from AEM.

Step 1: Open the URL <domain>/miscadmin#/etc/acs-commons/exporters
If you are running on your local machine then; e.g. http://localhost:4502/miscadmin#/etc/acs-commons/exporters

Go to Tools >> acs-commons >> Exporters from left side rail. Below is the screenshot of steps.

  1. Click on the Exporter folder
  2. Click on New >> New Page
  3. Create a page with any title using the default selected template(User to CSV Exporter).
  4. Click on create button.
This will create a new page under the exporter directory. Open the newly created page by double clicking on that page name.

Export users and groups list in AEM
Export User list in AEM

Step 2: Your Page will now look like this(below screenshot). From here you may add or remove the user profile properties, which you want to export and get appended in your exported CSV file.

Add Custom Property will let you add user properties (Relative path from the [rep:User] node). if you don't know the path and property name then you may refer the CRXDE-Lite to get the exact path and property name.(Below is the screenshot)
Custom user properties- user list export
Custom user properties

Screenshot to get the property name from crx/de. e.g designation, familyName
User profile section in CRXDE

Step 3:
Now Select the group membership the way which you want to export. Using 
Only Include Users by Group Membership option.

  1. Direct Membership : Only the direct member of groups.
  2. Indirect Membership: Only Indirect member of groups, means a group which is member of another group.
  3. Direct and Indirect Membership: Both direct and indirect membership.
Only Include Users by Group Membership option

Step 4: Now select all those groups whose members and user you want to export using Filter by Group option.(Select none for all groups). 
Download User CSV Report in AEM
Download User CSV Report
Step 5: After selecting the all groups click on the Download User CSV Report button to download the csv file.

You may also save the configuration for later use using the save configuration button.


References:

Remove all unused imports in one go using Eclipse IDE

Many times we face problem where some unwanted imports get added in the our program file. It is very irritating and time consuming task to remove those unused imports one by one, to make our code clear and readable.
But we do have a shortcut for this, just in a millisecond our Eclipse IDE done this job for us. Eclipse provide a shortcut CTRL + SHIFT + O, this shortcut command will remove all those unused imports from your code file. 

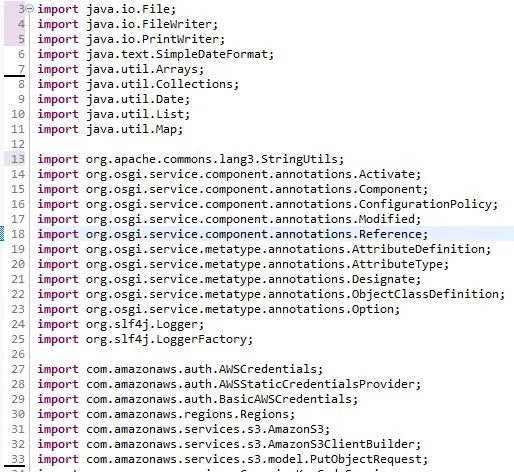
To do so, click anywhere in your java file and press CTRL+SHIFT+O. After using this shortcut command Eclipse will remove all the unused import from your java file. Below are the screen shots:

Before:

Unused imports in a java file
unused imports in a Java file
After using the shortcut CTRL+SHIFT+O, your java file will look like this.

After

How to remove unused imports
No unused imports